Installation & Getting Started
Welcome to the Models3D Studio for WooCommerce Knowledge Base!
This plugin empowers your WooCommerce store with a high-performance, interactive 3D model viewer via React Three Fiber (R3F), allowing customers to inspect products from every angle before purchasing.
Installation
- Download the
models3d-studio.zipfile from your purchase dashboard. - In your WordPress admin panel, navigate to Plugins -> Add New.
- Click Upload Plugin at the top of the page.
- Select the
.zipfile and click Install Now. - Once installed, click Activate Plugin.
Adding a 3D Model to a Product (BYOM)
- Navigate to Products -> All Products in your WordPress admin.
- Edit an existing product or click Add New.
- In the core Product data box, click the dedicated 3D Studio tab.
- Choose your 3D asset source:
- Local File: Drag and drop your
.glbor.gltffile directly into the upload zone (enforced up to a 15MB absolute safety limit). - Remote URL: Paste an external HTTPS URL to load models directly from a CDN or media bucket.
- Starter Library: Pick one of the 4 bundled starter models (High-Performance Sports Car, Forged Performance Wheel, Athletic Sneaker Showcase, or Designer Sunglasses) for immediate zero-friction testing.
- Local File: Drag and drop your
- The plugin automatically executes Pre-Flight validation to verify vertex counts (<250,000), structural integrity, and file size. If a
.glbexceeds 250,000 vertices or 3MB, the ⚠️ Optimization Required modal prompts you to run WebWorker Texture Crunching & Mesh Decimation (assets/js/workers/gltf-optimizer.js), converting embedded lossless PNG/JPG textures into WebP before upload. - Click Launch Visual Editor (which automatically saves your newly attached 3D model and opens the studio workspace) or click Update / Publish to save the product.
- Your frontend product gallery will now feature a high-performance 3D canvas instead of (or alongside) traditional images.
TIP
Resilient REST Media Uploads & WebP Texture Crunching: Models3D Studio includes built-in session auto-healing for WordPress REST uploads (preventing false "Cookie check failed" 403 errors from duplicate cookies) and an automated browser WebWorker that converts heavy PNG/JPG textures into lightweight WebP before upload on files over 3MB.
Supported Formats
- .GLB (Recommended): The binary form of glTF. It bundles all textures, shaders, and geometry into a single, highly compressed file.
- .GLTF: The JSON form of glTF. Ensure all associated
.binand texture files are uploaded together.
The WooCommerce Product Data Tab
When editing any WooCommerce product (Simple or Variable), you will find a dedicated 3D Studio tab located directly inside the core Product data meta box alongside Inventory, Shipping, and Attributes.
Features in the 3D Studio Tab
- Upload or Import: Drag and drop a custom model (.glb / .gltf) or paste a remote URL for seamless self-contained loading (validated against the 15MB file size and 250,000 vertex safety limits).
- Bundled Starter Model Selector: Quickly load one of the 4 built-in 3D assets (Sports Car, Forged Performance Wheel, Athletic Sneaker, or Designer Sunglasses) to test the studio environment without external files.
- Launch Visual Editor (with Auto-Save & Redirect): Clicking this button after uploading or selecting a
.glbmodel automatically saves the product and redirects straight into the full-screen 3D Visual Editor workspace. - Two-Tab Stale Overwrite Protection: A built-in dirty-state guard (
_models3d_metabox_dirty) ensures that saving an untouched product edit screen in another browser tab never overwrites newer 3D configurations saved inside the Visual Editor. - Toggle Developer JSON View
[PRO]: In Models3D Studio Pro, advanced users can reveal and edit the raw JSON configuration payload stored in WordPress post-meta directly from the product edit screen.
Global Plugin Settings Dashboard
Models3D Studio features a dedicated global settings control center under WooCommerce -> 3D Studio -> Settings (admin.php?page=models3d-studio&tab=settings). This console enables store administrators to generate a 1-click sample product, configure site-wide canvas placement, enable archive badges, calibrate viewport dimensions, and manage 3D asset security.
Quick Start: 1-Click Sample 3D Product Generator
At the top of WooCommerce -> 3D Studio -> Settings (and on the Plugins screen row), click ⚡ Create Sample 3D Product (Draft) to automatically generate a complete variable WooCommerce product (Athletic Sneaker Showcase (3D Sample)) with 3 attributes (Color, Accent, Lace), pre-mapped PBR material variations, and camera focus transitions ready to inspect in the Visual Editor or preview on your storefront in 10 seconds.
Canvas Placement Strategies (models3d_canvas_placement)
Control how the interactive 3D WebGL canvas attaches to single product pages:
- Replace Gallery (
replace- Default): Completely replaces WooCommerce's default product image gallery hook (woocommerce_show_product_images). Designed for stores providing an immersive, 3D-first product showcase in place of static photography. - Append to Gallery (
append): Hooks intowoocommerce_product_thumbnailsto render the 3D canvas directly below the standard product image gallery. Visitors can explore standard photo galleries and 3D models side-by-side. - 3D Modal / Lightbox Button (
modal): Keeps your native 2D product image gallery 100% untouched and adds an interactive "🧊 View in 3D & AR" trigger button below the gallery. Clicking the button launches a full-viewport 3D & AR modal dialog with a synchronized WooCommerce variation selector bar. Zero WebGL JavaScript is initialized until the shopper clicks the trigger button. - Manual Shortcode / Block Only (
shortcode): Suppresses automated theme template interception entirely. Allows you to manually position the 3D viewer anywhere on the page using the Models3D 3D Viewer & AR Gutenberg block (models3d/viewer) or the[models3d_viewer]shortcode inside custom page builder templates.
Shop & Category Archive "🧊 3D & AR" Badge (models3d_archive_badge_enabled)
When enabled (yes by default), Models3D Studio automatically renders a lightweight, zero-WebGL "🧊 3D" (or "🧊 3D & AR" when Mobile AR is enabled on the product) badge overlay on product cards across WooCommerce Shop, Category, and Block (FSE woocommerce/product-image) archive grids so shoppers immediately spot which products feature interactive 3D inspection.
3D Loading & Poster Mode (models3d_loading_mode)
Protect Core Web Vitals and Largest Contentful Paint (LCP) performance on mobile and desktop:
- Auto-Load 3D Model (
auto- Default): Displays the 2D poster image (your custom 3D poster or WooCommerce Featured Image) immediately while streaming and compiling the.glb3D scene in the background, cross-fading automatically once ready. - Click-to-Load 3D (
interaction): Displays the lightweight 2D poster image with an interactive "🧊 View in 3D" button overlay. No.glbnetwork requests or WebGL contexts are initialized until the shopper explicitly clicks or taps "View in 3D".
Viewport Dimension Calibration
Ensure clean visual presentation across all device viewports:
- Desktop Canvas Height (
models3d_canvas_height_desktop): Sets the CSS viewport height on desktop screens (defaults to600px). Accepts valid CSS units (px,vh,vw,rem,em,%). - Mobile Canvas Height (
models3d_canvas_height_mobile): Sets the CSS height on mobile viewports under 768px (defaults to400px). Prevents oversized canvases on smaller mobile screens. Accepts valid CSS units (px,vh,vw,rem,em,%).
Strict Compatibility Mode (models3d_strict_compatibility_mode)
When enabled (yes), EventBridge activates strict defensive DOM querying and polling timeouts. This guarantees seamless variation synchronization on stores using heavily customized child themes, AJAX page transitions, or non-standard variation swatch plugins that override standard WooCommerce form events.
3D Asset Theft Protection (models3d_protect_models) [PRO]
In Models3D Studio Pro, enabling Protect all .glb / .gltf 3D models across the store against direct downloading & scraping (or enabling it per product inside the Visual Editor's Asset workspace) replaces raw /wp-content/uploads/*.glb URLs in storefront HTML with expiring (15-minute) HMAC-SHA256 signed stream tokens (action=models3d_stream_protected_model). Direct browser URL access or curl requests without the active viewer handshake return 403 Forbidden, and the first 64KB of the glTF binary header and JSON scene graph are byte-scrambled in transit and decoded in memory before GLTFLoader parsing.
Frontend Shortcode & Page Builder Integration
For stores designed with Gutenberg (Block Editor), Elementor, Divi, Bricks, or custom templates, Models3D Studio provides both a native Gutenberg Block and a versatile Frontend Shortcode that can render either a configured WooCommerce 3D product or any standalone .glb / .gltf file on non-product pages and blog posts.
Native Gutenberg Block (models3d/viewer)
In the WordPress Block Editor, search for Models3D 3D Viewer & AR (models3d/viewer under the Media category). The block sidebar (InspectorControls) provides two source modes:
- WooCommerce 3D Product: Pick any configured 3D product from a live dropdown to inherit its variations, hotspots, animations, and lighting.
- Standalone
.GLBFile (Media Library / URL): Select or upload any.glb/.gltffile and optional 2D poster image directly from the WordPress Media Library to embed an interactive 3D & AR viewer on landing pages, blog posts, or portfolios without creating a WooCommerce product. - Per-Block Visual Overrides: Customize Canvas Height (e.g.,
520px), HDRI Lighting Preset (studio,warehouse,sunset,city, etc.), Background Color Override (transparentor#hex), Auto-Rotate toggle, and Mobile AR ("View in Your Space") button toggle.
Shortcode Syntax & Parameters
text
[models3d_viewer id="476" class="custom-showcase-viewer"]Or embed a standalone .glb file on any page or post with per-instance overrides:
text
[models3d_viewer src="https://example.com/wp-content/uploads/model.glb" poster="https://example.com/wp-content/uploads/poster.webp" height="520px" preset="studio" background="transparent" auto_rotate="true" ar="true"]Or render a popup modal trigger button instead of an inline canvas:
text
[models3d_viewer id="476" mode="modal" button_text="Launch 3D & AR Configurator"]id(optional): The WooCommerce Product ID to render. If omitted on a single product page, the shortcode automatically resolves and displays the current product's 3D asset.src/model_url(optional): Direct HTTPS URL to a.glbor.gltffile for standalone non-product embeds.poster(optional): Direct HTTPS URL to a 2D poster thumbnail image for standalone embeds.mode(optional):inline(default) ormodal(renders a"🧊 View in 3D & AR"trigger button that opens the full-screen 3D modal lightbox on click).button_text(optional): Custom label for the modal trigger button whenmode="modal".height(optional): Custom CSS height for the viewer container (e.g.,520px,70vh).preset(optional): Override the HDRI lighting preset (studio,warehouse,sunset,dawn,night,forest,apartment,park,lobby,city).background(optional): Override the canvas background (transparentor hex color such as#0f172a).auto_rotate(optional):trueorfalseto override turntable auto-rotation.ar(optional):trueorfalseto toggle the Mobile AR ("View in Your Space") button on standalone embeds.class(optional): Additional CSS classes appended to the wrapper element (.models3d-shortcode-wrapper.custom-react-gallery-wrapper).
Architectural Collision Guard
To prevent duplicate WebGL contexts, redundant EventBridge bindings, and GPU memory leaks, the shortcode engine includes an Architectural Collision Guard (GalleryArchitect.php):
- When the global placement setting is set to Replace Gallery (
replace) and an inline[models3d_viewer]shortcode for that same product is embedded on its single product page, the shortcode automatically self-suppresses. - Because the primary gallery hook already mounts the 3D canvas for that product, suppressing duplicate mounts ensures single WebGL instance integrity and maintains 60 FPS performance.
Page Builder Decoupled Enqueuing
Page builders like Elementor, Divi, and Bricks frequently store layout structures in custom metadata rather than standard post content. Models3D Studio uses decoupled late-asset enqueuing (GalleryArchitect.php) to guarantee that React Three Fiber scripts, Draco WASM decoders, and canvas styles load reliably across all page builder environments.
Starter 3D Model Library
To facilitate rapid prototyping and testing without requiring external 3D assets, Models3D Studio includes a bundled library of 4 production-grade 3D assets:
- High-Performance Sports Car (
sports-car.glb— 1.16 MB, 41 layers): High-fidelity automotive model featuring distinct mesh layers for body paint, carbon fiber aero trim, tinted windows, wheels, brake calipers, and cockpit interior. - Forged Performance Wheel (
forged-performance-wheel.glb— 2.05 MB, 11 layers): Multi-part forged alloy wheel assembly engineered for dual-channel customization, featuring switchable spoke geometry (5-Spoke Twinvs.10-Spoke Competition), switchable hub mounting (5-Lug OEMvs.GT3 Center-Lock), brake caliper, rotor, and tire tread. - Athletic Sneaker Showcase (
advanced_sneaker_showcase.glb— 0.61 MB, 10 layers + 3 embedded keyframe animations): Multi-part footwear geometry with separate mesh nodes for rubber sole, knit upper, fabric tongue, modular laces, eyelets, and accent stripes, plus 3 embedded Blender keyframe animation clips (Floating_Hover,Exploded_Parts_Inspection, andLace_And_Swoosh_Highlight). - Designer Sunglasses (
sunglasses.glb— 0.25 MB, 8 layers): Modern eyewear asset with acetate frames, polarized UV lenses, metallic temple hinges, and nose pads.
Instant 1-Click Loading
You can load any starter model with a single click from the 3D Studio product tab or directly inside the Asset workspace of the Visual Editor. The asset's complete mesh hierarchy and embedded animation tracks are immediately extracted, enabling instant attribute, material, and animation mapping.
Step-by-Step Tutorial: Building a 3D Configurable Product
Follow this comprehensive, hands-on tutorial to learn how to create a variable WooCommerce product, attach a high-performance 3D model, calibrate lighting and camera angles, configure colorways and modular parts, and verify live dynamic switching on your storefront.
Full Video Walkthrough
Watch the complete 11-minute hands-on video walkthrough covering every click from initial WooCommerce variable product setup to 3D GLB model upload, PBR material tuning, modular mesh visibility overrides, and live storefront testing:
Video Chapters & Timestamps
00:00— Creating a Variable Product & Setting Featured Image00:21— Configuring Attributes:color,lace,sole,size01:37— Generating 48 Product Variations & Setting Bulk Regular Price02:06— Attaching the 3D GLB Model in the 3D Studio Tab02:25— Publishing Product & Launching the Visual Studio Editor02:33— Visual Editor Workspace Overview (Dual-Channel Architecture)03:01— Scene Lighting Presets, Background Gradients [PRO] & Contact Shadows03:25— Turntable Auto-Rotation, 3D Model Rotation Speed Control (0.1x–10.0x) & Camera FOV Calibration (31°)03:45— Capturing the Default 3/4 Hero Camera View04:01— Material & Finish: Mapping PBR Colors to Shoe Upper Mesh06:16— Mesh Layers Visibility Toggles [PRO]: Modular Laces with 🎯 Pick 3D07:26— Mesh Layers Visibility Toggles [PRO]: Modular Outsoles with 🎯 Pick 3D08:46— Saving Configuration & Live Status Confirmation09:01— Live Storefront Demo: Instant 3D Color & Geometry Swapping09:46— Visual Editor Layer Sync & Lighting Touch-ups10:47— Final Storefront Showcase: Interactive 360° Orbit & Swatches
Phase 1: WooCommerce Variable Product & Attributes
Before opening 3D Studio, always define your product attributes and variations natively in WooCommerce. This ensures all variation options are stored in the database and automatically populated inside the 3D Visual Editor.
- In WordPress Admin, navigate to Products -> Add New.
- Enter the product title (e.g. "sneaker").
- In the Product data dropdown, select Variable product.
- Click the Attributes tab and add four custom attributes:
- color:
red | white | blue(Check Used for variations). - lace:
Option A | Option B(Check Used for variations). - sole:
Option A | Option B(Check Used for variations). - size:
L | XL | XXL | XXXL(Check Used for variations).
- color:
- Click Save attributes.
- Switch to the Variations tab and click Generate variations (or Regenerate variations). WooCommerce will create all 48 combinations ($3 \times 2 \times 2 \times 4 = 48$).
- Under Bulk actions, select Set regular prices, enter
200.00, and click OK. - Set the main product image in the sidebar Product image box.
Phase 2: Attaching the 3D Model
With variations saved, attach your 3D asset directly inside the product edit screen:
- Click the dedicated 3D Studio tab in the Product data box.
- Under the Sample Model library, click Load Model on the Athletic Sneaker Showcase (0.61 MB, 10 layers), or drag-and-drop your custom
.glbasset into the upload zone. - The Pre-Flight Inspector verifies vertex counts and topology.
- Click Publish (or Update) in the top-right WordPress Publish box to save the post-meta.
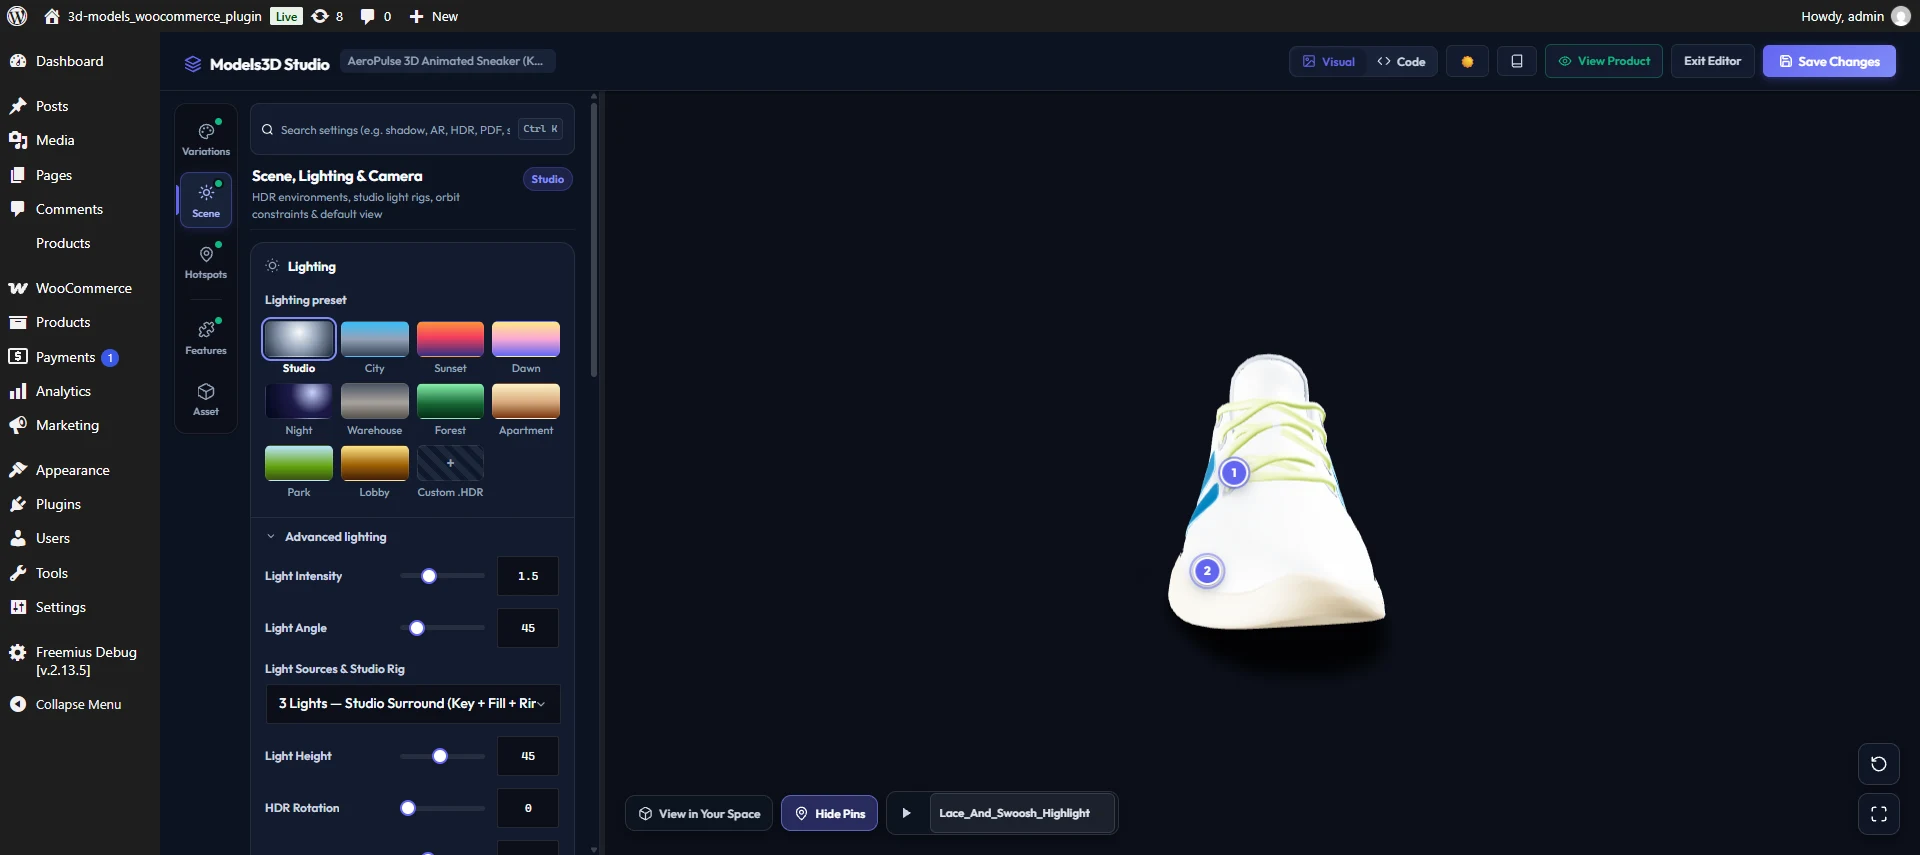
Phase 3: Scene Lighting, Turntable & Merchandising Camera View
Launch the fullscreen Visual Editor to establish the environment lighting, embedded animations, and default camera perspective:
- Click Launch Visual Editor from the 3D Studio product tab.
- In the left navigation rail, click the Scene workspace:
- Lighting Preset: Select from 10 built-in Drei studio presets (e.g. Warehouse, Studio, Sunset, City) paired with a scale-independent 3-Point Directional Studio Lighting Rig (
StudioLightingRig) andACESFilmicToneMapping. (Note: Multi-Light Studio Rigs, Elevation, HDR Rotation, Exposure, and Custom .HDR uploads are unlocked in Models3D Studio Pro). - Light Intensity: Adjust slider from
0.0xto5.0x(default:1.5x) for balanced illumination and specular reflections. - Light Angle (Azimuth) (Free & Pro): Rotate the directional studio light rig around the model from
0°to360°(default:45°) to place key highlights on the hero face of your product. - Pro Studio Lighting & .HDR Suite
[PRO]: Expand Advanced lighting to select from 6 Light Sources & Studio Rig modes (3_point,2_light,1_light,front_showcase,top_softbox, or orbit-syncedheadlamp), adjust Light Height (10°–85°), spin HDR Rotation (0°–360°), and fine-tune Exposure (0.2x–3.0x). - Background: Set to Transparent to blend with your WooCommerce theme, or pick a custom solid color. (Note: Background gradients & image backdrops are unlocked in Models3D Studio Pro).
- Shadows & Auto-Rotate: Enable Ground Shadows is set to OFF by default to maximize 60fps rendering speed; toggle ON to render ambient occlusion contact shadows (
opacity = 0.85). Toggle Auto-Rotate 3D Model ON for continuous 360° showcase rotation and calibrate Rotation Speed from 0.1x to 10.0x (Free & Pro). - Embedded 3D Animations
[PRO]: If your.glbmodel includes keyframe animations, configure the default animation clip, loop mode, playback speed, and toggle Show Play / Pause Bar on Storefront so shoppers can control variation or hotspot animations on the canvas.
- Lighting Preset: Select from 10 built-in Drei studio presets (e.g. Warehouse, Studio, Sunset, City) paired with a scale-independent 3-Point Directional Studio Lighting Rig (
- Under Default camera view and Camera limits:
- Orbit the product in the canvas to your preferred 3/4 hero angle.
- Click Capture Default View (with Also update 2D Poster thumbnail from this angle enabled to automatically capture and upload a
1024×1024WebP poster image in 1 click). - Expand Camera limits to adjust Field of View (FOV) (
10°–90°), choose Camera Orbit Limits (Free 360° Orbit,Horizon Lock — Above Floor Only, orHorizontal Turntable Only), toggle Allow Close-Up / Interior Zoom, or toggle Lock Panning (Keep Model Centered).
Phase 4: Material Swaps & PBR Finishes
Switch to the Variations workspace in the left rail. Notice that Models3D Studio automatically extracts your WooCommerce attributes (e.g., color (3), lace (2), sole (2), size (4)):
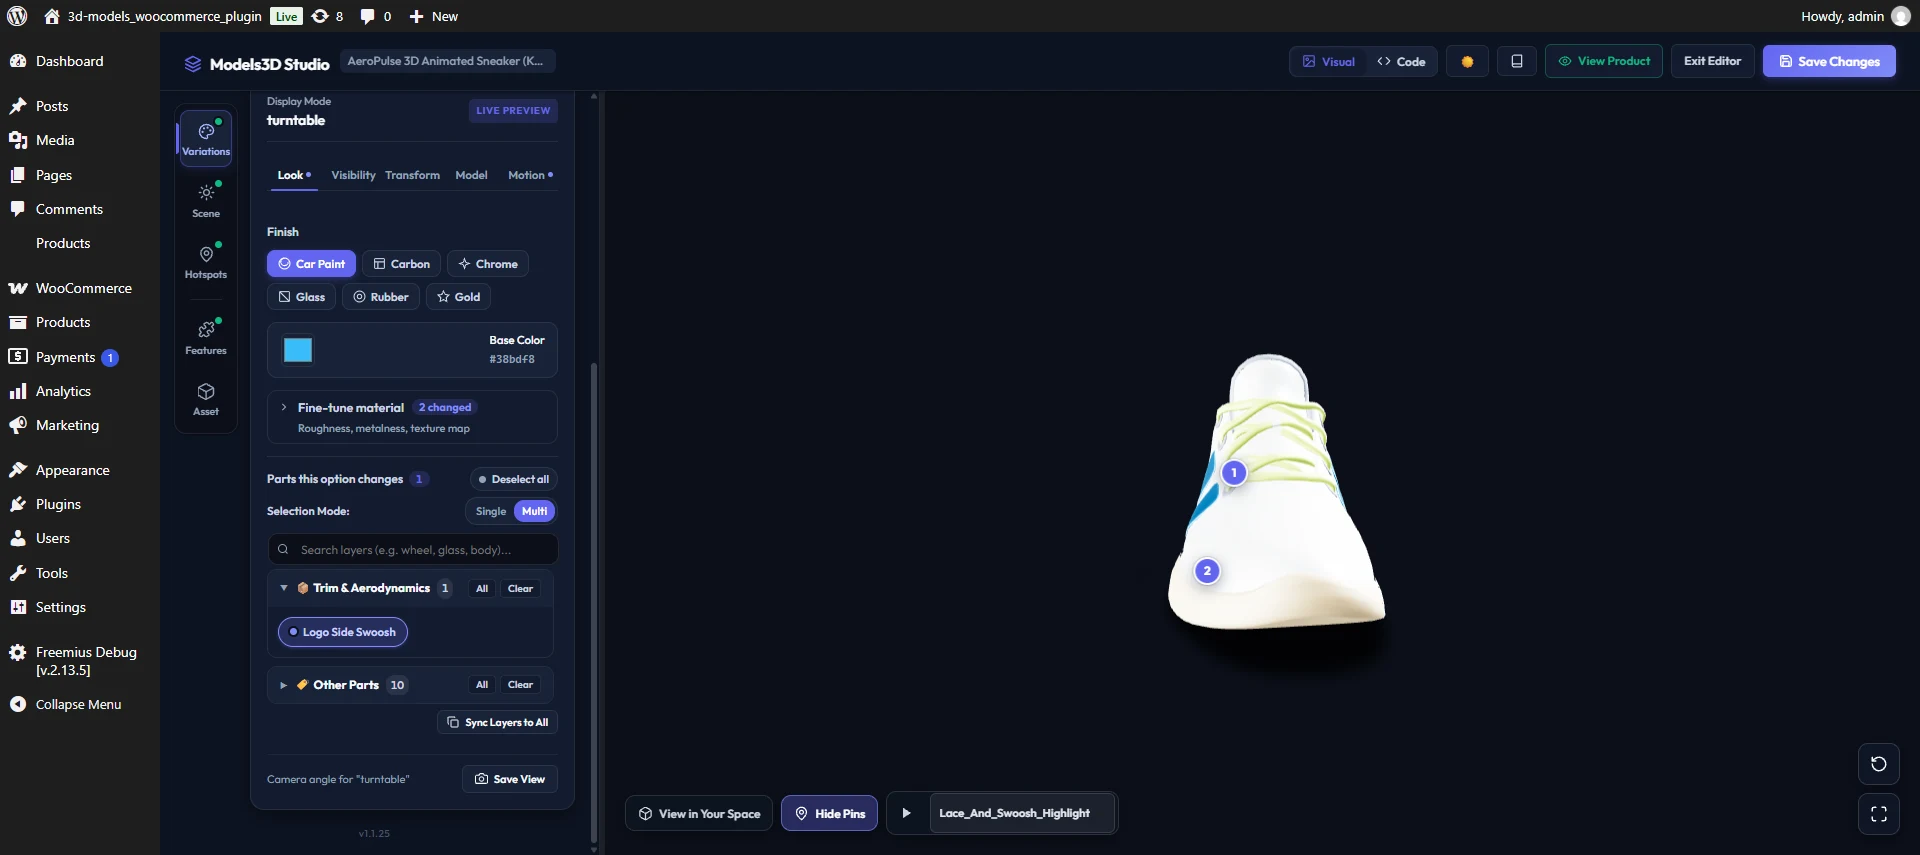
1. Configuring Option: red
- Under
color, select the red option pill. - In the Variation Inspector, the Look sub-tab opens with Finish PBR presets (
Car Paint,Carbon,Chrome,Glass,Rubber,Gold) and Base Color right at the top. - Choose a finish preset or dial in Base Color to
#d62828, and expand Fine-tune material to adjust Roughness, Metalness, or apply a Custom Texture Map[PRO]. - Under Parts this option changes, use the layer search bar, expand a smart category, or click directly on the 3D canvas to select target meshes (e.g.,
Shoe Upper Mesh). - The 3D canvas updates immediately with the vibrant red coating, and the option pill's color dot updates live.
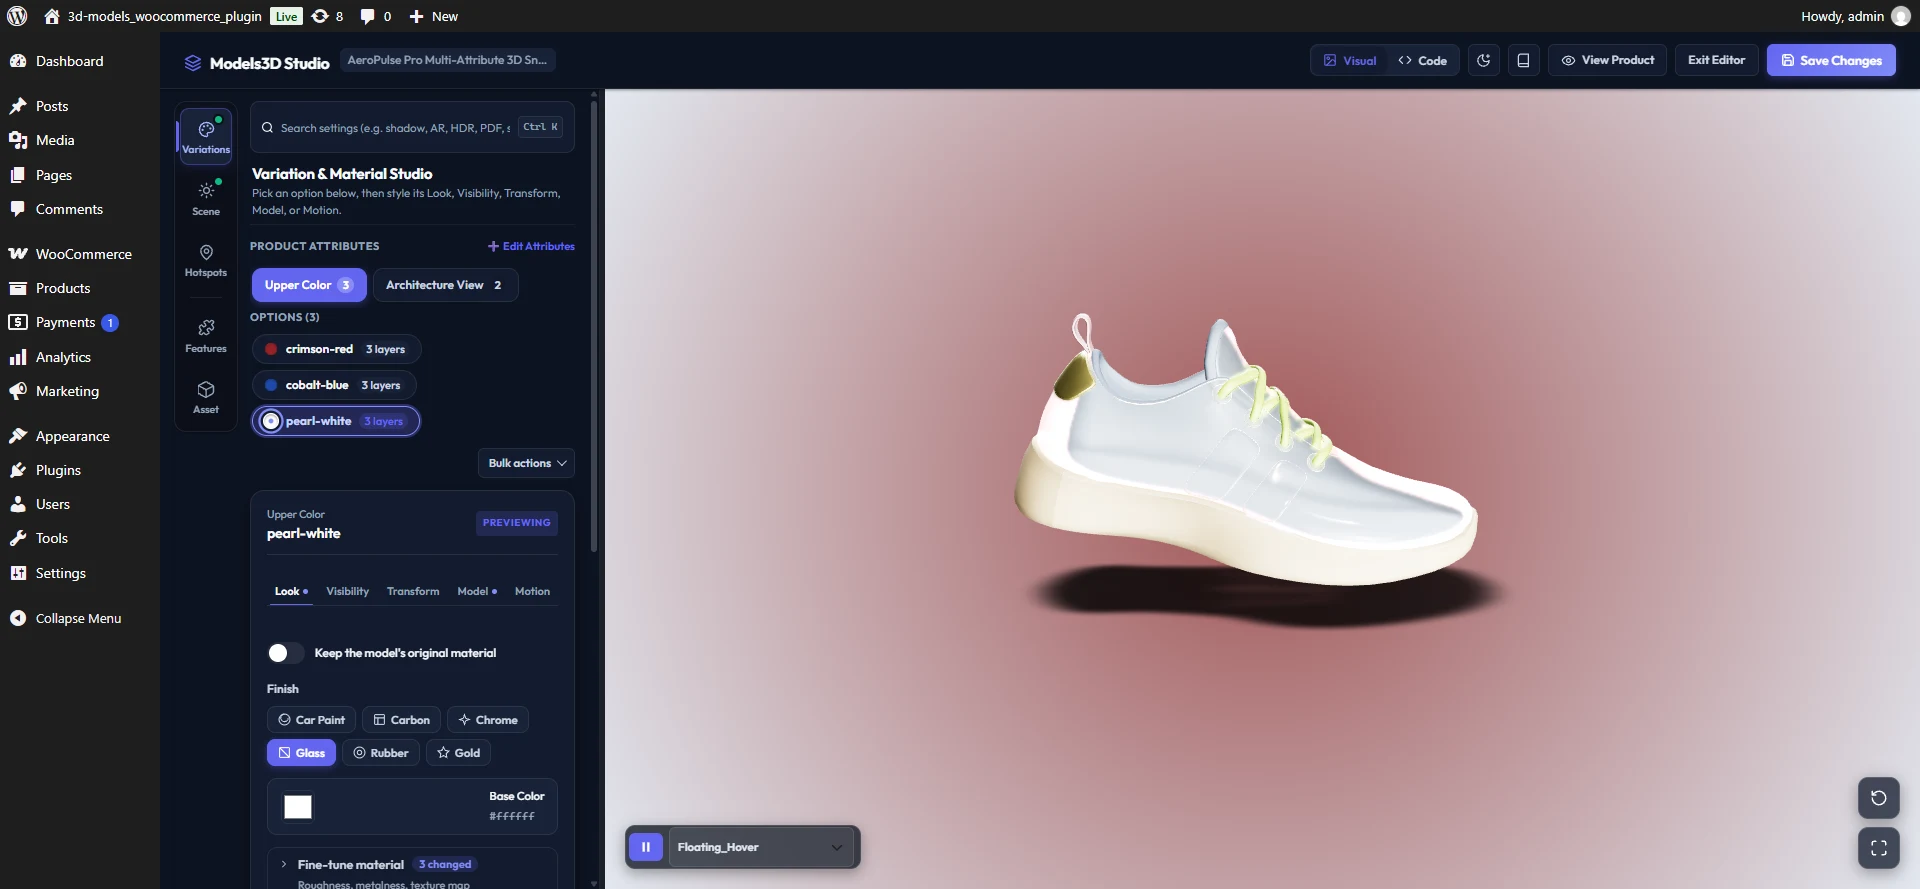
2. Configuring Option: white
- Select the white pill under
color. - In the Look sub-tab, set Base Color to
#ffffff(crisp white) or toggle Keep Original Model Material inside Fine-tune material if your 3D model already has baked base textures. - Target the same
Shoe Upper Meshlayer (or click Sync Layers to All onredto copy the target mesh selection across all options in 1 click).
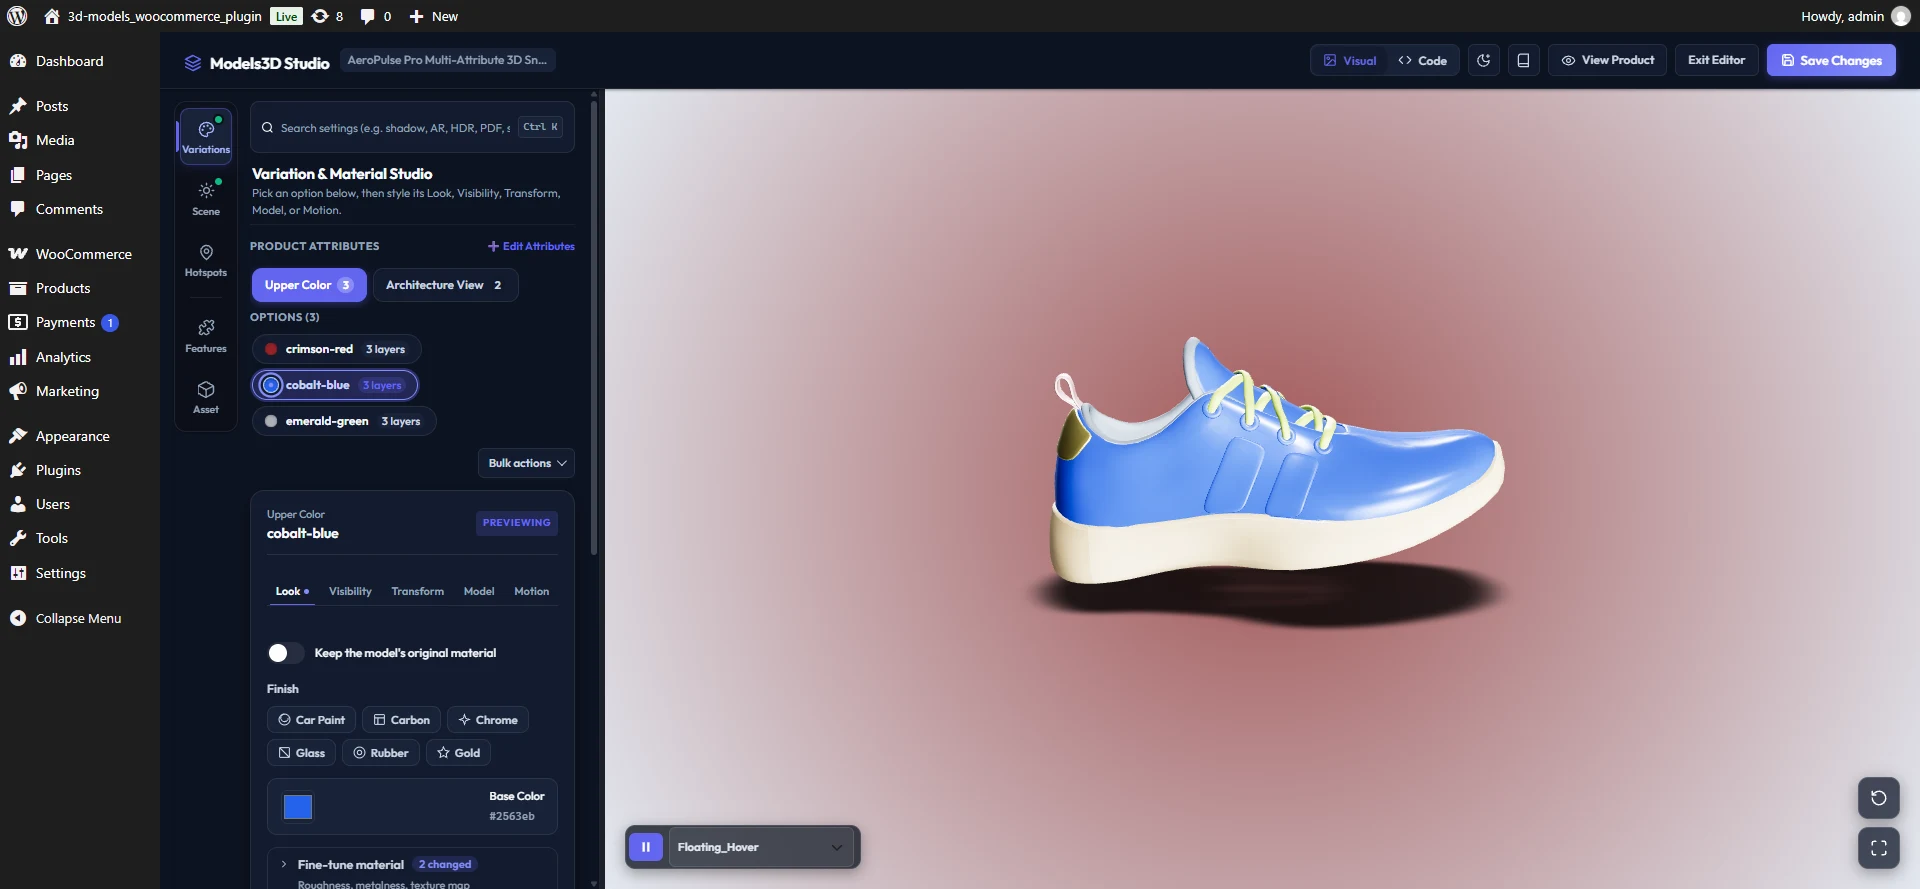
3. Configuring Option: blue
- Select the blue pill under
color. - In the Look sub-tab, set Base Color to
#2196f3(electric blue) with subtle gloss. - Target
Shoe Upper Mesh. The 3D model instantly morphs to dynamic blue.
Phase 5: Modular Geometry Swapping with Visibility Overrides
PRO CAPABILITY: 5-TAB VARIATION INSPECTOR (`Visibility`, `Transform`, `Model`, `Motion`)
While the Look sub-tab (PBR colors, roughness, metalness, and presets) is included in the Free Community Edition, upgrading to Models3D Studio Pro unlocks custom .webp/.jpg texture map swapping plus the Visibility (Show/Hide meshes with 🎯 Pick 3D), Transform (Scale/Position/Rotation offsets), Model (separate .glb file per variation), and Motion (per-variation keyframe animation clip) sub-tabs.
When variations require swapping physical parts—such as modular lace styles or outsole geometries—use the Visibility sub-tab:
1. Attribute: lace (Modular Laces)
- Click the lace (2) attribute tab.
- Click the Visibility sub-tab inside the Variation Inspector.
- For
Option A: Use 🎯 Pick 3D to click the sport laces directly on the model (or search the layer list) and setShoe Laces Classicto visible andShoe Laces Sportto hidden. - For
Option B: Invert the visibility rules—setShoe Laces Sportto visible and hideShoe Laces Classic.
2. Attribute: sole (Interchangeable Outsoles)
- Click the sole (2) attribute tab and switch to the Visibility sub-tab.
- For
Option A: Bind toShoe Sole Classic(Show) and hideShoe Sole Platform. - For
Option B: Use 🎯 Pick 3D on the platform sole to showShoe Sole Platformand hideShoe Sole Classic. - The 3D viewport instantly switches the physical outsole geometry when toggling between options.
Phase 6: Storefront Verification & Cart Integration
Save your changes and preview the live WooCommerce product page:
- In the top-right header of the Visual Editor, click Save Changes. A green confirmation toast will confirm that the configuration was saved to WordPress post-meta and includes an instant View Product ↗ shortcut link.
- Click the dedicated View Product button directly in the Visual Editor header bar (or click Exit Editor to return to the WooCommerce product screen) to open the product on your live storefront.
- Verify Interactive Morphing:
- Change Color in the dropdown or swatch (
RED,Blue,White):- Selecting RED renders the deep metallic red finish.
- Selecting Blue morphs the body to vibrant high-gloss blue in real time.
- Selecting White switches to crisp pearl white.
- Notice that material transitions occur instantly with zero page reloads via the built-in R3F EventBridge.
- Change Color in the dropdown or swatch (
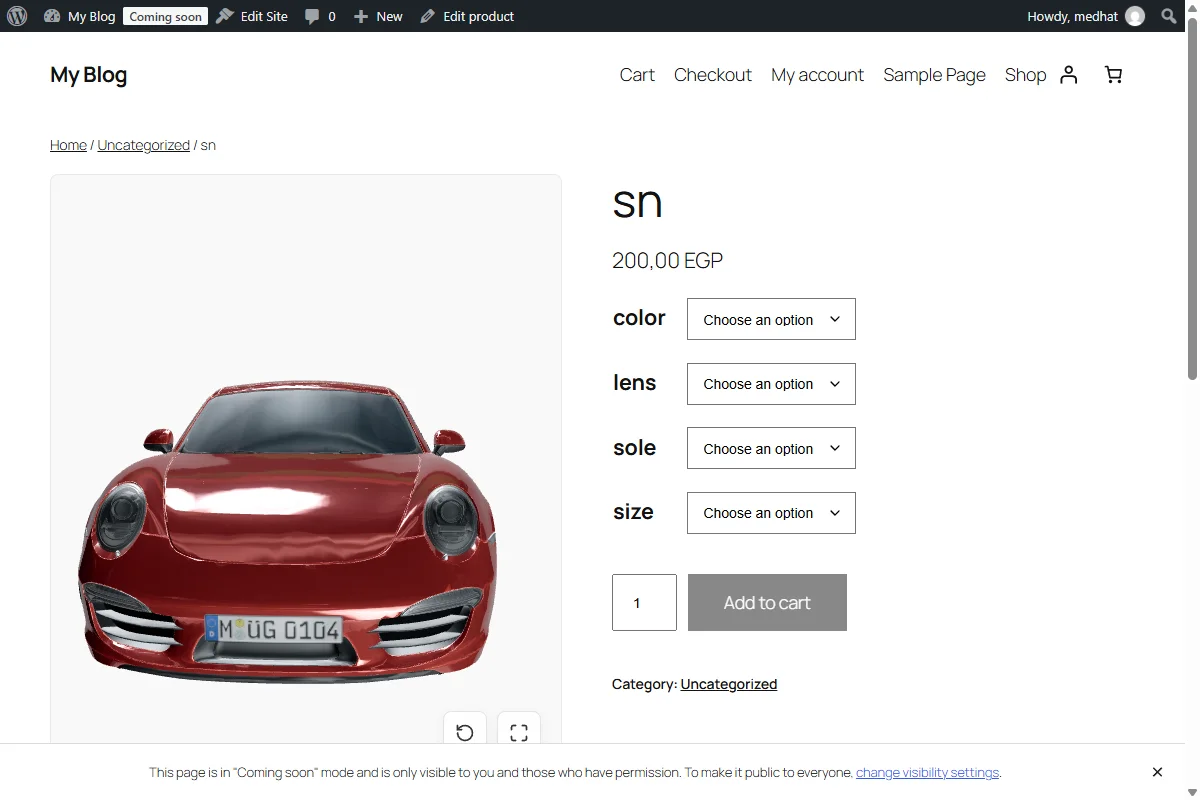
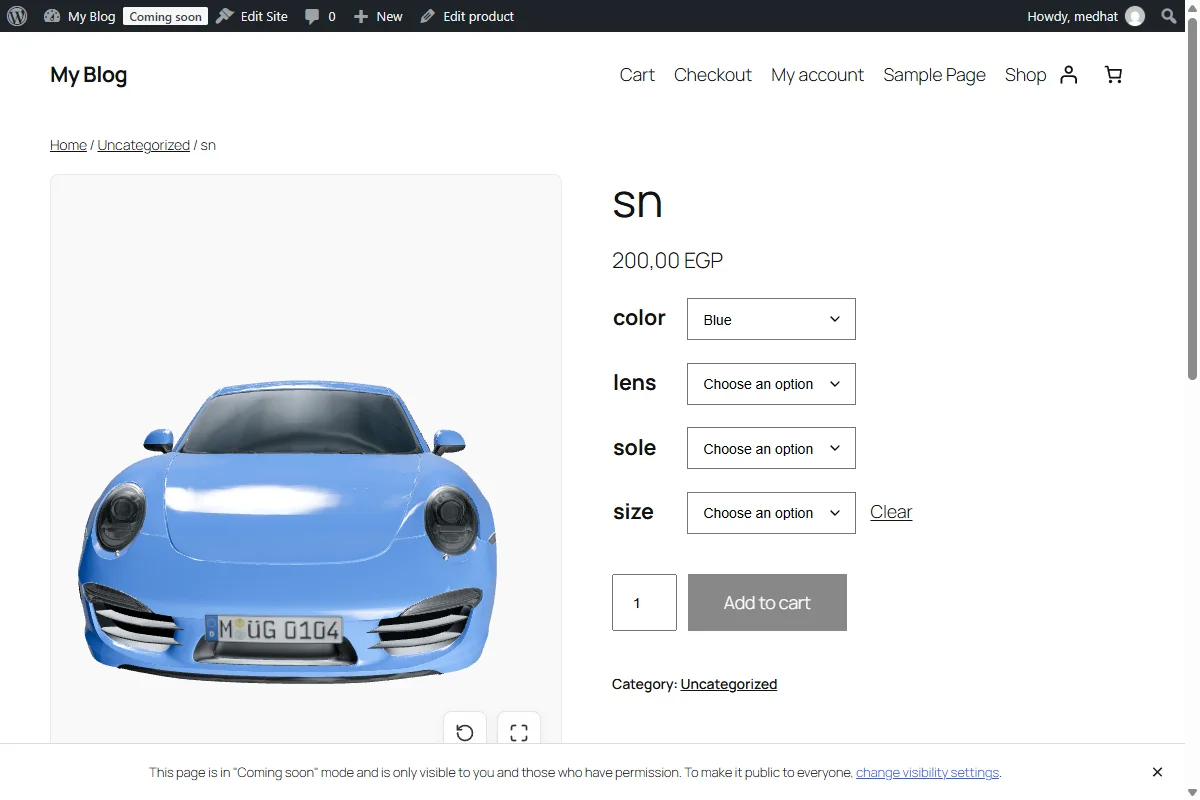
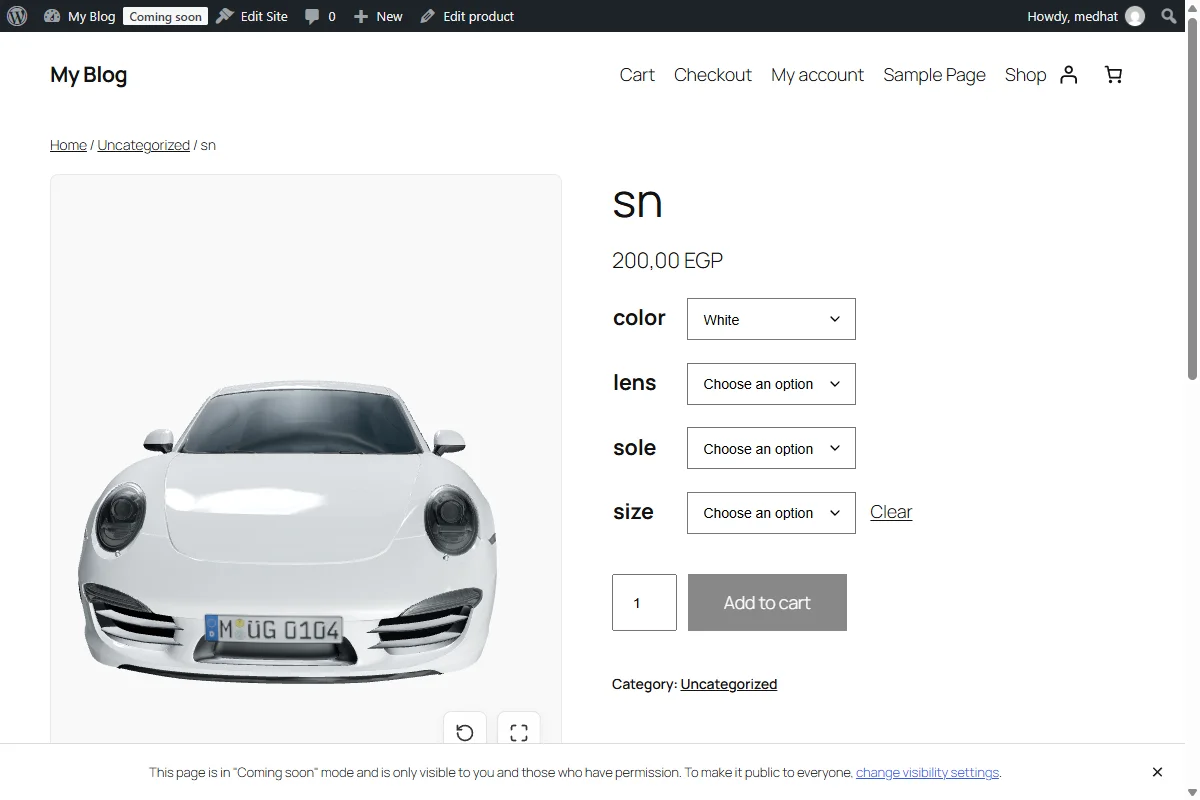
- Click Add to cart.
- Navigate to the Cart page: verify that the line item displays the exact selected variation string (and in Models3D Studio Pro, automatically captures and displays a live
320×320WebP snapshot of the customer's exact 3D configuration in the Cart, Checkout, Order Emails, and HPOS Admin Orders).
Frequently Asked Questions
A curated list of common inquiries regarding Models3D Studio, performance guidelines, and WooCommerce integration.
General Setup
Do I need prior 3D modeling experience?
No. Models3D Studio operates on a Bring-Your-Own-Model (BYOM) architecture. Assuming you have a standard .glb or .gltf file, our Visual Editor allows you to intuitively map variations, place 3D hotspots, and adjust camera angles without touching a single line of 3D code.
Does it work seamlessly with variable products?
Yes. You can create and save your attributes natively in WooCommerce, or use the + Edit Attributes drawer directly inside the Visual Editor. You can also assign separate .glb files per variation (in Pro) if your variations have completely different 3D models (such as AI-generated Meshy AI assets).
Can I duplicate mesh selections across all options?
Yes. Click the Sync Layers to All button in the variation card footer. The plugin will automatically replicate the current mesh layer assignments across all other terms of that attribute in a single click.
Can I embed a 3D model on a landing page or blog post without a WooCommerce product?
Yes. Both the Free and Pro editions include the Models3D 3D Viewer & AR Gutenberg Block (models3d/viewer) and [models3d_viewer src="https://.../model.glb"] shortcode, allowing you to embed any .glb file from your Media Library on any page or post.
Performance, AR & Accessibility
How does the plugin handle models of drastically different physical sizes?
Models3D Studio features a Scale-Aware 3D Auto-Framing Engine. On model load, the engine calculates the asset's true geometric bounding sphere and dynamically sets the camera distance, frustum near/far clipping planes, and orbit zoom limits. A 20cm sneaker and a 5m sports car are both framed at their optically ideal distance automatically.
How does Mobile Augmented Reality ("View in Your Space") work on iOS and Android?
In Models3D Studio Pro, enabling Mobile Augmented Reality (AR) adds a "View in Your Space" button to the storefront viewer:
- On Desktop: Clicking "View in Your Space" opens an instant, zero-dependency SVG QR Code modal with the customer's active variation selections encoded (
?m3ds_ar=1&attribute_...) while pre-warming the variation's.glband.usdzfiles in the background. - On iPhone / iPad (iOS Safari): Automatically exports the live Three.js scene (including active variation colors, custom texture maps, and hidden/shown parts) into an Apple-compliant
.USDZarchive (USDZExporterwith 64-byte alignment) and launches native iOS ARKit Quick Look. - On Android: Launches an instant in-browser Live Camera AR experience (
getUserMediarear camera behind the interactive 3D model) with an option to launch Google Scene Viewer on ARCore devices.
Is the 3D viewer compliant with WCAG 2.2 and the European Accessibility Act (EAA)?
Yes. Models3D Studio includes native WCAG 2.2 / EAA accessibility out of the box in both Free and Pro editions:
- Reduced Motion (
prefers-reduced-motion: reduce): Automatically pauses initial turntable auto-rotation and auto-playing keyframe animations for visitors with vestibular motion sensitivity. - Full Keyboard Navigation: Focusing the 3D viewer (
Tab) lets users orbit the camera withArrowLeft/ArrowRight/ArrowUp/ArrowDown, zoom with+/-, toggle rotation withSpace, and reset the camera view withRorHome. - Screen Reader Announcements (
aria-live="polite"): Variation changes, hotspot focus, and camera resets are announced cleanly to assistive technologies.
Why is my model failing to upload?
Models3D Studio enforces a strict 250,000 vertex ceiling and a 15MB absolute file size safety limit. These guardrails guarantee a 60fps rendering experience, prevent PHP out-of-memory (OOM) server timeouts, and stop excessive mobile battery drain. If your file exceeds 250,000 vertices, the pre-flight validator intercepts it so you can decimate geometry in Blender or utilize our built-in WASM Optimizer.
Does the plugin handle texture and geometry compression?
Yes. Models3D Studio combines two client-side optimization technologies:
- Intelligent WebWorker Texture Crunching (>3MB): When uploading a
.glbexceeding 3MB, the ⚠️ Optimization Required prompt launchesassets/js/workers/gltf-optimizer.jsto convert embedded lossless PNG/JPG textures into lightweight WebP inside your browser before uploading. - Local Bundled WASM Draco Compression: The plugin bundles the Google Draco WebAssembly (WASM) storefront decoder (
draco_decoder.wasm,draco_decoder.js,draco_wasm_wrapper.js) anddraco_encoder.jslocally inside/assets/draco/(with the WASM encoder compiled intoassets/js/workers/gltf-optimizer.jsand zero external CDN dependencies), compressing geometry and vertex arrays for rapid storefront loading.
Technical Troubleshooting
Why is my model completely black or missing textures?
This is almost universally a CORS (Cross-Origin Resource Sharing) configuration issue. If your store uses a CDN (like Cloudflare) or offloads media to a separate subdomain, WebGL cannot securely load the textures unless the correct Access-Control-Allow-Origin headers are present.
Why do I see a "Cookie check failed" error when uploading models?
In WordPress, browser cookie shadowing across root paths or stale duplicate session cookies can occasionally cause REST API authentication checks to reject valid uploads with a 403 error. Starting in v1.1.3, Models3D Studio automatically intercepts and heals duplicate session cookies via determine_current_user, isolating the valid authentication token so that model uploads succeed seamlessly without requiring manual cookie clearance.
How do I test Pro features on staging or local environments?
Local and staging license testing is handled natively through Freemius Cloud under WooCommerce -> 3D Studio -> License. You can activate developer sandbox keys or staging licenses directly in the Freemius management interface without configuring custom server constants.
Can I install and activate the Pro version while the Free edition is currently active?
Yes. Starting in v1.1.3, Models3D Studio features an automatic sibling deactivation guard. When you upload and activate models3d-studio-pro.zip, WordPress cleanly deactivates the Free community edition without triggering PHP class redeclaration fatal errors. All your existing 3D assets, camera presets, and variation rules are preserved untouched.
What happens to my 3D configurations during plugin uninstallation?
By default, uninstallation preserves all product 3D configurations in WordPress post-meta to prevent accidental data loss during updates. If you wish to purge all plugin data completely upon deletion, enable the Erase all 3D Studio data on uninstallation toggle in plugin settings.
Creative Studio: Overview & Workspaces
The core of Models3D Studio is the Visual Studio v2 Editor. Engineered around a modern 5-workspace Left Rail, a sticky Quick-Jump Search Bar (Ctrl+K), and a multi-tab Variation Inspector, the studio puts every 3D configurator tool within 1 click without deep scrolling:
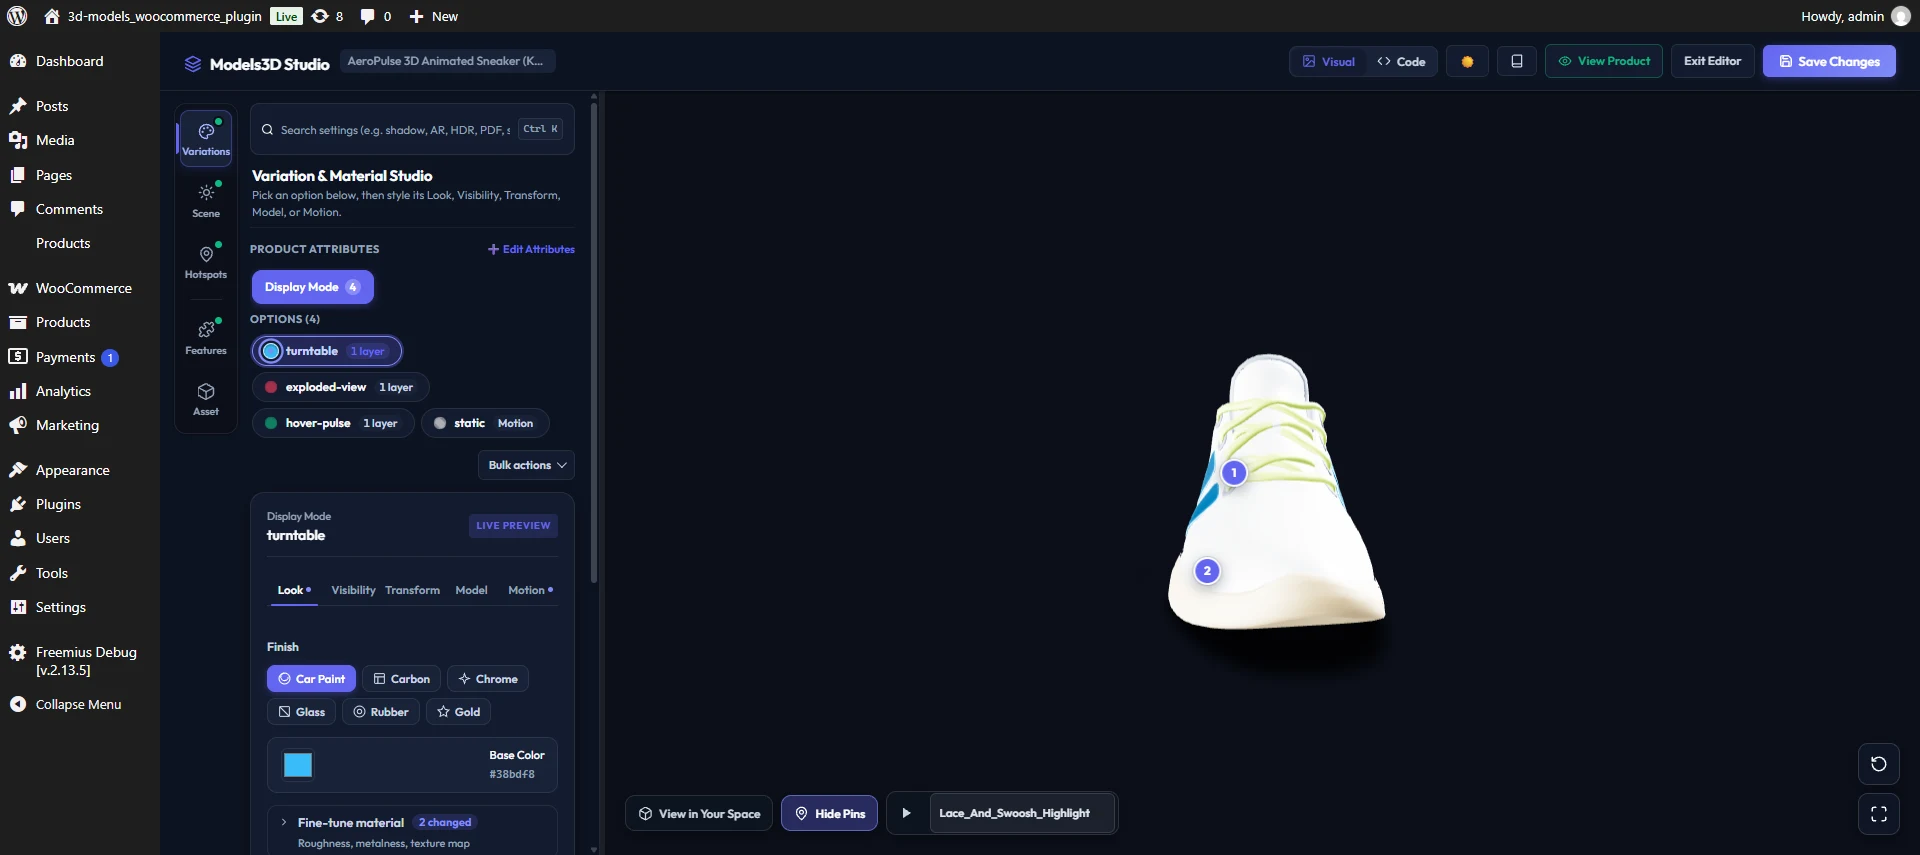
The 5-Workspace Left Rail
The vertical Left Rail organizes product configuration into five focused workspaces separated into Creative Design (top group) and Storefront Features & Asset Management (bottom group), each with live status dots indicating active overrides:
- 🎨 Variations Workspace: Manage WooCommerce attributes (
+ Edit Attributes), switch variation option pills (with live color dots and smart status badges), run 1-click batch automation (📸 Capture All Thumbnails,📋 Copy Config,📥 Paste Config), and style each option via the 5-Tab Variation Inspector (Look,Visibility,Transform,Model,Motion). - 💡 Scene Workspace: Configure HDRI lighting presets, the 6-mode Pro Studio Lighting & .HDR Suite, canvas backgrounds (transparent, solid, gradients, photo backdrops), ground shadows, turntable auto-rotation, Embedded 3D Keyframe Animations (
[PRO]) + Storefront Play/Pause Bar, Default Camera View & 1-Click 2D Poster Capture, and Camera Limits (FOV, Orbit Lock, Close-Up/Interior Zoom, Lock Panning). - 📍 Hotspots Workspace (
[PRO]): Click directly on the 3D model surface to place interactive spatial annotation pins with custom badge styles (1, 2, 3,Dot,Pulse,+) and 6 storefront click actions (Info Card,Camera Focus,Trigger Variation,Swap .GLB Model,Play Animation,External Link). - 🧩 Features Workspace: Enable high-converting storefront add-ons with a live active badge counter: Mobile Augmented Reality (AR & QR) (
[PRO]), 3D Dimensions Ruler (W × H × D) ([PRO]), Procedural Exploded View Slider ([PRO]), PDF Spec Sheet Download ([PRO]), and Share Configuration Link (Free & Pro). - 📦 Asset Workspace: Inspect active
.glbmetrics and layer counts, toggle per-product 3D Asset Theft Protection ([PRO]), replace or upload a new.glbmodel, switch between the 4 bundled Starter 3D Models, or reset/delete the 3D configuration.
Quick-Jump Setting Search (Ctrl+K / ⌘K)
Pinned at the top of the studio sidebar, the Quick-Jump Search Bar (Search settings (e.g. shadow, AR, HDR, PDF, speed)...) lets you jump straight to any control across all 5 workspaces:
- Press
Ctrl+K(or⌘Kon macOS) from anywhere in the editor to focus the search input. - Type any keyword (
hdr,shadow,ar,qr,fov,pan,zoom,poster,pdf,explode,ruler,drm,protect,texture,animation,hotspot) and select a match to automatically switch to that workspace, expand any collapsed section, scroll the control into view, and highlight it with a pulse halo.
Studio Header Bar Actions
The top header bar of the Visual Editor provides instant access to key workflow actions:
- 🖼️ Visual /
<>Code Switcher: Toggle between the Visual Studio inspector and the bidirectional Developer JSON Code Mode ([PRO]). - ☀️ / 🌙 Theme Toggle: Switch between Dark Mode and Light Mode (
Outfit&Intertypography with calibrated contrast tokens). - 📖 Docs: Opens this bundled VitePress Knowledge Base in a new tab.
- 💎 Pro Features (Free Edition): Opens an interactive overview of Models3D Studio Pro capabilities.
- 👁️ View Product: Immediately opens the live storefront product page (or draft preview link) in a new tab to inspect your 3D configuration in context.
- Exit Editor: Returns directly to the WooCommerce product edit screen (
post.php). - Save Changes: Commits the complete 3D configuration to WordPress post-meta and displays a confirmation toast with a quick View Product ↗ link.
Launching the Editor & 1-Click Variation Setup Helper
You can launch the visual editor for any Simple or Variable WooCommerce product:
- Navigate to Products -> All Products and edit your product.
- In the Product data meta box, click the 3D Studio tab.
- Upload a
.glbmodel or select one of the 4 starter models, then click Launch Visual Editor (which automatically saves your product and opens the studio). - ⚡ Auto-Enable Storefront Variation Dropdowns: If your product has attributes attached but is still set as a Simple product (or is a Variable product missing published priced variations), the Visual Editor displays an actionable banner at the top of the Variations workspace. Clicking ⚡ Auto-Enable Storefront Variation Dropdowns automatically converts the product to Variable, marks all attributes as visible and used for variations, and generates published priced variations so dropdown selectors appear immediately on the storefront.
Variations Workspace & 5-Tab Inspector
The Variations Workspace connects every WooCommerce attribute option to five independent 3D customization channels inside a compact, non-scrolling 5-Tab Variation Inspector (Look, Visibility, Transform, Model, Motion).
Sub-Tab 1: Look (PBR Presets, Base Color, Texture Maps & Target Layers)
The Look sub-tab places the most frequently used material controls right at the top of the inspector:
- 1-Click PBR Finish Presets (
Free & Pro):- Car Paint (
car_paint): Deep, high-gloss automotive finish (roughness: 0.15,metalness: 0.85,clearcoat: 1.0). - Carbon (
carbon): Matte woven carbon composite (roughness: 0.65,metalness: 0.15). - Chrome (
chrome): Ultra-reflective mirror finish (roughness: 0.05,metalness: 1.0). - Glass (
glass): Smoked / tinted translucent glass (roughness: 0.10,transmission: 0.90,ior: 1.50). - Rubber (
rubber): Satin plastic / rubber matte finish (roughness: 0.85,metalness: 0.05) for footwear soles, grips, tires, and modern polymers. - Gold (
gold): Brushed gold / brass metallic sheen (roughness: 0.35,metalness: 0.90).
- Car Paint (
- Base Color Picker (
Free & Pro): Instant hex color picker that updates the 3D viewport and the variation pill's status dot in real time without re-fetching the.glb. - Fine-Tune Material Drawer (
Roughness,Metalness,Keep Original Material, &Custom Texture Map):- Keep Original Model Material (
Free & Pro): Deactivates custom color/roughness overrides to preserve the original baked GLTF textures for that variation option. - Roughness (
0%–100%) & Metalness (0%–100%) (Free & Pro): Fine-tune surface micro-scatter and metallic reflectivity. - Custom Texture Map (
.WEBP/.JPG/.PNG) & UV Repeat ([PRO]): Upload or pick a seamless Wood, Fabric, Leather, Carbon, or Brushed Metal image texture from the WordPress Media Library per variation, and adjust UV Repeat X / Y (0.1x–20x) with automatic planar UV projection fallback for CAD meshes lacking UV coordinates.
- Keep Original Model Material (
- Parts This Option Changes (Target Mesh Layers):
- Toggle between Single Mode (1 mesh layer) and Multi Mode (multiple mesh layers simultaneously).
- Search mesh layers, expand Smart Mesh Categories (Wheels & Brakes, Body & Panels, Trim & Aerodynamics, Interior, Lenses, Sole, Upper), or click directly on parts in the 3D viewport.
- Click Sync Layers to All at the bottom of the mesh list to copy the selected target mesh layers to every other option in the active attribute in 1 click.
Sub-Tab 2: Visibility (Show / Hide Parts & 🎯 Pick 3D) [PRO]
Show or hide modular 3D geometry layers when a variation option is selected (e.g., swapping 5-Spoke vs 10-Spoke wheel rims, Classic vs Sport laces, or optional accessories):
- Toggle Show / hide specific parts for this option.
- Use the 🎯 Pick 3D button next to Parts to HIDE or Parts to SHOW to click parts directly on the 3D model, or use the quick-filter search bar.
Sub-Tab 3: Transform (Scale / Position / Rotation Offsets) [PRO]
Move, scale, or rotate specific 3D parts (or the entire model) around a shared world-space bounding-box pivot per variation:
- Transform Target Parts: Optionally select specific mesh chips so only targeted components (e.g., a tabletop or spoiler) scale/shift, or leave empty to transform all parts mapped to the variation.
- Uniform Scale (
0.1x–3.0x): 1-drag proportional scale slider plus independent Scale X / Y / Z multipliers. - Position Offset (
ΔX / ΔY / ΔZ) & Rotation Offset (°X / °Y / °Z): Precision scene-unit and degree offsets with a 1-click Reset button.
Sub-Tab 4: Model (Separate .GLB File & 2D Thumbnail per Variation) [PRO]
Assign a completely separate .glb / .gltf file and a dedicated 2D WooCommerce thumbnail to an individual variation option:
- Separate 3D Model per Option: Ideal when variations represent distinct geometries or standalone AI-generated models (e.g., 3 separate models generated in Meshy AI) without merging meshes in Blender.
- Unified Drag-and-Drop,
Upload .GLB&Media LibraryOptimizer Pipeline: Drop a.glbfile directly onto the Custom 3D Model (.GLB) dropzone, clickUpload .GLBto browse from disk, or clickMedia Libraryto select an existing attachment (or upload inside the WordPress Media modal). All three paths automatically run Pre-Flight Validation (250,000vertex /3MBoptimization check &15MBceiling), in-browser WebAssembly Draco + WebP compression (gltf-optimizer.js), capture-phasewp.mediaPlupload interception, in-place Media Library replacement (models3d/v1/replace-media), and sub-mesh layer extraction (extracted_meshes). - 2D Variation & Cart Thumbnail (
📸 Capture 3D/🖼️ Media): Capture a live WebP snapshot from the 3D viewport or pick a Media Library image for that variation's swatch and cart thumbnail.
Sub-Tab 5: Motion (Per-Variation Keyframe Animation) [PRO]
Trigger a specific embedded .glb keyframe animation clip whenever the customer selects that variation option (e.g., playing an Exploded_Parts_Inspection clip when Display Mode: Exploded View is chosen), with per-variation Playback Mode (Loop Continuously, Play Once & Hold End Frame, or Ping-Pong).
Per-Variation Camera View & Bulk Actions
- Per-Variation Camera Angle (
Free & Pro): In theCamera angle for "<option>"bar at the bottom of the Variation Inspector, orbit the 3D model to the best angle for that option and click📷 Save View. When saved, a greenSavedbadge andResetbutton appear. - Bulk Actions Menu (
📸 Capture All Thumbnails,📋 Copy Config,📥 Paste Config—[PRO]):- 📸 Capture All Thumbnails (Virtual Photographer): Automatically iterates through every option in the active attribute, renders the 3D state in the viewport, captures a WebP thumbnail, uploads it to the WordPress Media Library, and binds
thumbnail_urlfor WooCommerce swatches and cart thumbnails. - 📋 Copy Config / 📥 Paste Config: Copy the complete Studio JSON configuration to your clipboard or paste a configuration from another product (with an option to Keep this product's current 3D model (
.glb) while importing lighting, camera, and variation rules).
- 📸 Capture All Thumbnails (Virtual Photographer): Automatically iterates through every option in the active attribute, renders the 3D state in the viewport, captures a WebP thumbnail, uploads it to the WordPress Media Library, and binds
Attribute & Option Navigation
Navigating complex products with dozens of variation terms is fast and scannable:
- Product Attributes Header &
+ Edit AttributesDrawer: Switch between WooCommerce product attributes (Color,Finish,Size,Display Mode) or click+ Edit Attributesto add/update WooCommerce attributes and regenerate variations without leaving the Visual Editor. - Smart Option Pill Strip: Each variation option pill displays a live color dot (reflecting the option's configured hex color or original material state) and a smart status badge summarizing what that option customizes (
2 layers,1 hidden,Scaled,GLB,Motion, orUnmapped). - Smart Sub-Tab Auto-Focus: Clicking an option pill automatically activates its primary configured sub-tab (e.g., switching to
Motionif that option only triggers an animation, orVisibilityif it only hides/shows parts), while glowing indicator dots (•) on the sub-tab headers show which channels have active rules. - Frictionless Grab-to-Scroll & Auto-Centering: Drag horizontally to pan across long attribute lists; clicking a pill smoothly centers it using
easeOutQuintphysics.
Scene, Lighting & Animations Workspace
The Scene Workspace controls environment lighting, studio rigs, backgrounds, shadows, turntable rotation, embedded .glb keyframe animations, default camera framing, and orbit limits:
HDRI Environment Presets
Choose from 10 high-dynamic-range lighting environments built on @react-three/drei:
- Studio: Clean, neutral product photography lighting with balanced rim lights.
- Warehouse: Crisp industrial lighting with bright specular reflections.
- Warm Sunset: Golden-hour natural illumination with warm highlights.
- Dawn: Soft morning ambient glow.
- Forest: Natural outdoor ambient lighting with soft green and earth tones.
- Apartment: Cozy interior ambient illumination with domestic light bounces.
- Park: Vibrant open-air daylight.
- Lobby: Architectural indoor lighting with polished floor reflections.
- Urban City: Crisp outdoor daylight with architectural reflection maps.
- Night Studio: Moody, dramatic low-key contrast lighting.
PRO FEATURE: STUDIO LIGHTING & .HDR SUITE
While the Free Community Edition includes all 10 Drei studio presets, a scale-independent 3-Point Studio Lighting Rig, Light Intensity (0.0x–5.0x), and Light Angle Azimuth (0°–360°), upgrading to Models3D Studio Pro unlocks the complete Studio Lighting & .HDR Suite: 6 selectable multi-light studio rigs (3_point, 2_light, 1_light, front_showcase, top_softbox, and orbit-synced headlamp), Light Elevation (10°–85°), 360° HDR Reflection Rotation, ACES Filmic Tone Mapping Exposure (0.2x–3.0x), and custom .hdr environment file uploads.
Scale-Independent Studio Lighting Rig & Advanced Lighting
Every 3D model is illuminated by a scale-independent directional lighting system (StudioLightingRig) paired with ACESFilmicToneMapping so models of any physical bounding-box scale are evenly lit without dark falloff:
- Light Intensity (
0.0xto5.0x, default1.5x— Free & Pro): Precision numeric slider to tune overall scene brightness and environment reflections. - Light Angle / Azimuth (
0°to360°, default45°— Free & Pro): Rotate the directional studio light rig horizontally around the 3D model to place key highlights on the exact contour you want to emphasize. - Light Sources & Studio Rig (
[PRO]): Choose from 6 commercial lighting architectures:3_point— 3 Lights — Studio Surround (Key + Fill + Rim) (Default)2_light— 2 Lights — Key + Back Rim1_light— 1 Light — Single Key Sourcefront_showcase— 3 Lights — Front Showcase (Cavity Fill)top_softbox— 3 Lights — Overhead Softboxheadlamp— Camera Headlamp (Follows Orbit Angle)
- Light Height / Elevation (
10°to85°, default45°—[PRO]): Control the vertical angle of directional studio lights. - HDR Rotation (
0°to360°, default0°—[PRO]): Independently spin the HDRI environment map reflections around the vertical axis. - Exposure (
0.2xto3.0x, default1.0x—[PRO]): Calibrate ACES Filmic camera exposure.
Background, Ground Shadows & Turntable Auto-Rotate
- Background (
Free & Pro): Set to Transparent or Solid Color in Free; unlock Linear Gradients, Radial Studio Vignettes, and Custom Photo Backdrops in Models3D Studio Pro. - Ground Contact Shadows (
Free & Pro): Set to OFF (shadows_enabled: false) by default for sub-second initial canvas rendering; toggle ON to render soft ambient occlusion contact shadows (opacity = 0.85) beneath the model. - Turntable Auto-Rotate & Speed (
Free & Pro): Toggle Auto-Rotate 3D Model for continuous 360° presentation and adjust Rotation Speed (0.1x to 10.0x) in both Free and Pro editions.
Embedded 3D Keyframe Animations & Play/Pause Bar [PRO]
Located inside the Scene workspace (#m3ds-scene-animations-card), Embedded 3D Animations detects all skeletal, morph-target, and keyframe animation tracks inside your .glb file:
- Enable Default Scene Animation: Choose a default animation clip (or
Play All Animations Simultaneously), toggle Auto-Play on Storefront Load, test playback live in the viewport, and expand Playback details to set Loop Mode (Loop Continuously,Play Once & Hold End Frame,Ping-Pong) and Animation Speed (0.1x–3.0x). - Show Play / Pause Bar on Storefront: Available independently even when Enable Default Scene Animation is unchecked—allowing shoppers to pause, resume, or switch clips triggered by Variations (
Motiontab) or 3D Hotspots.
Interactive 3D Hotspots Workspace
In Models3D Studio Pro, the Hotspots Workspace (📍 Hotspots) lets you place interactive spatial annotations and feature callouts directly on the surface of your 3D product:
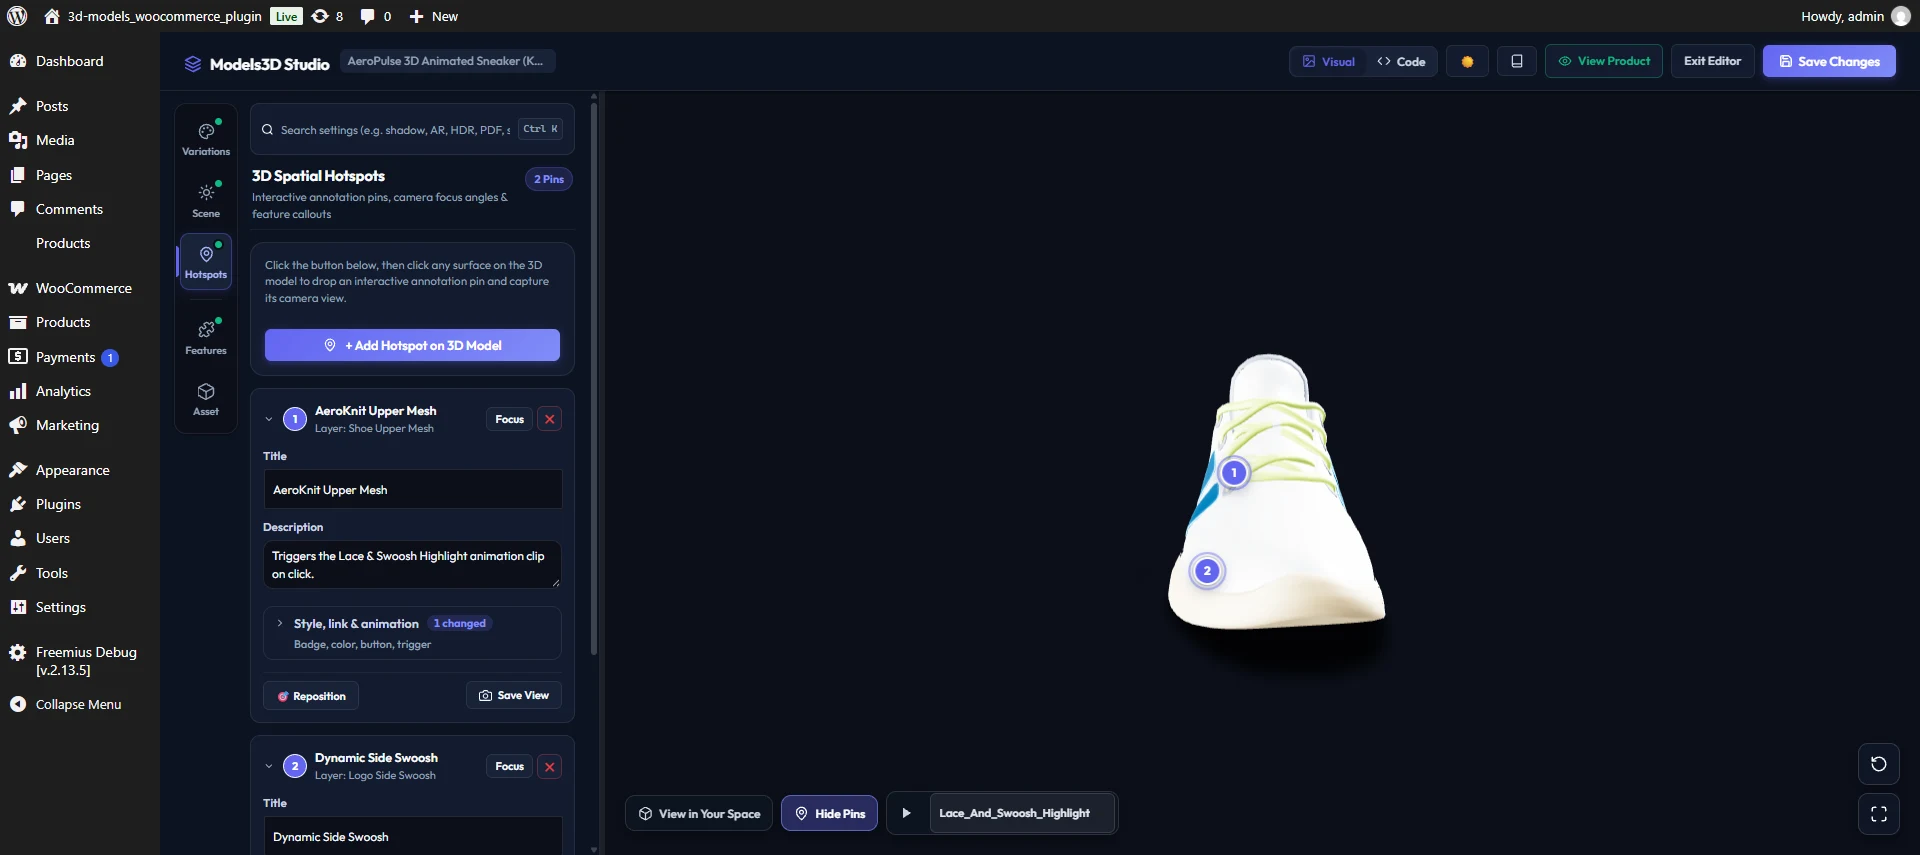
Click-to-Place Raycast Workflow
- Click
+ Add Hotspot on 3D Model. The viewport cursor switches to a precision target crosshair. - Click any surface point on the 3D model. The editor raycasts the exact 3D surface coordinates (
[x, y, z]) and surface normal vector ([nx, ny, nz]), creating a new collapsible hotspot card and capturing the current camera view as that pin's focus angle. - Click any hotspot card header (or its chevron) to expand or collapse its settings, keeping long lists of pins compact and scannable.
Pin Styles & 6 Interactive Click Actions
Each hotspot supports 4 badge styles (Numbered 1, 2, 3, Minimal Dot, Pulsing Beacon, or + Icon) and 6 storefront click actions:
- Info Popover Card (
info_card): Opens a floating glassmorphic card displaying the pin's Title, Description, and optional CTA Link / Button while smoothly orbiting the camera to the pin's saved focus angle. - Camera Focus Only (
camera_focus): Smoothly glides the camera to inspect that component close-up without opening a text card. - Trigger WooCommerce Variation (
variation_select): Automatically selects a specific WooCommerce attribute and term (e.g.,pa_color: midnight) on the storefront form and morphs the 3D model. - Swap 3D Model (
model_swap): Dynamically loads an alternate.glb3D model into the scene when clicked. - Play 3D Animation (
animation_play): Triggers a specific embedded.glbanimation clip (repeat,once, orpingpong). - Open External Link (
external_link): Opens a specification URL or anchor link when clicked.
Storefront Features, AR & CAD Workspace
The Features Workspace (🧩 Features) consolidates all interactive storefront HUD add-ons, Mobile Augmented Reality, and B2B CAD specification tools into a single scannable panel with a live active counter badge:
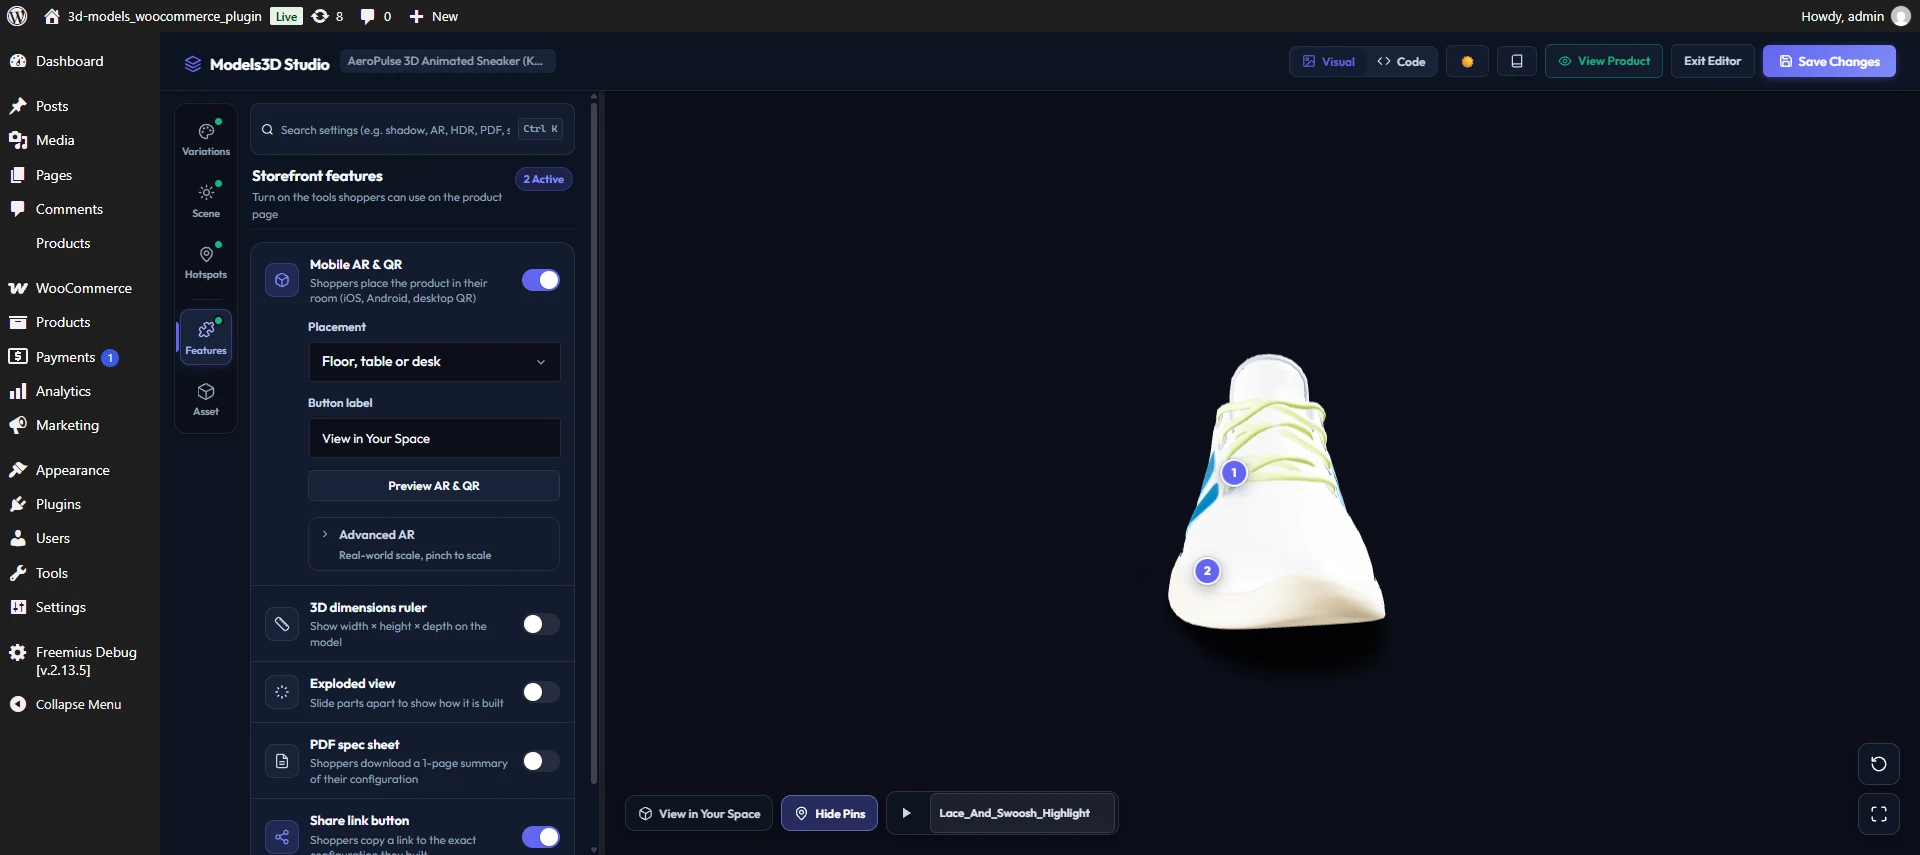
- 📱 Mobile Augmented Reality — "View in Your Space" (
[PRO]):- Enables the "View in Your Space" HUD button for iOS ARKit Quick Look (
.USDZ), Android Live Camera AR & Scene Viewer (.GLB), and the Desktop-to-Mobile SVG QR Code Modal. - Expand AR options to configure Custom Button Label, AR Placement Surface (
Floor / Horizontal Surfacevs.Wall / Vertical Surfacefor mirrors, wall art, or sconces), and AR Scale Mode (Auto / Allow Resizingvs.Lock 1:1 Physical Scale).
- Enables the "View in Your Space" HUD button for iOS ARKit Quick Look (
- 📏 3D Dimensions Ruler (
W × H × D) ([PRO]):- Renders interactive CAD bounding-box measurement lines and
Width × Height × Depthlabels around the 3D model on the storefront, updating dynamically when variations transform or explode the model. - Configure Show Ruler by Default on Load, Display Unit (
cm,mm,m,in), and Scene Unit to Physical Multiplier (e.g.,100when1Three.js unit equals1meter and display unit iscm).
- Renders interactive CAD bounding-box measurement lines and
- 💥 Procedural Exploded View Slider (
[PRO]):- Adds an interactive
💥 Explode(0%–100%) range slider to the storefront HUD that radially separates multi-part 3D assemblies along their bounding-box vectors relative to the model origin—requiring zero Blender keyframe animations. - Configure Max Explosion Distance (
0.5x–4.0x) and test the explosion live in the Visual Editor viewport.
- Adds an interactive
- 📄 PDF Spec Sheet Download (
[PRO]):- Adds a
📄 Spec Sheetbutton to the storefront HUD that generates and downloads a 1-page printable A4 PDF combining a high-resolution (960×600) 3D studio snapshot of the customer's active configuration, product title, price, SKU, selected WooCommerce variation attributes, 3D bounding-box dimensions, and a direct shareable configuration URL.
- Adds a
- 🔗 Share Configuration Link (
Free & Pro):- Adds a
🔗 Sharebutton to the storefront HUD that copies a deep-linked URL (?attribute_pa_color=...) to the shopper's clipboard so they can share their exact 3D configuration with colleagues or clients, and preserves attribute query parameters on WooCommerce Cart item permalinks.
- Adds a
3D Model Workspace & Inspection
The Asset Workspace (📦 Asset, formerly 3D Model Workspace) serves as your 3D asset inspection center, anti-scraping security controller, and model manager:
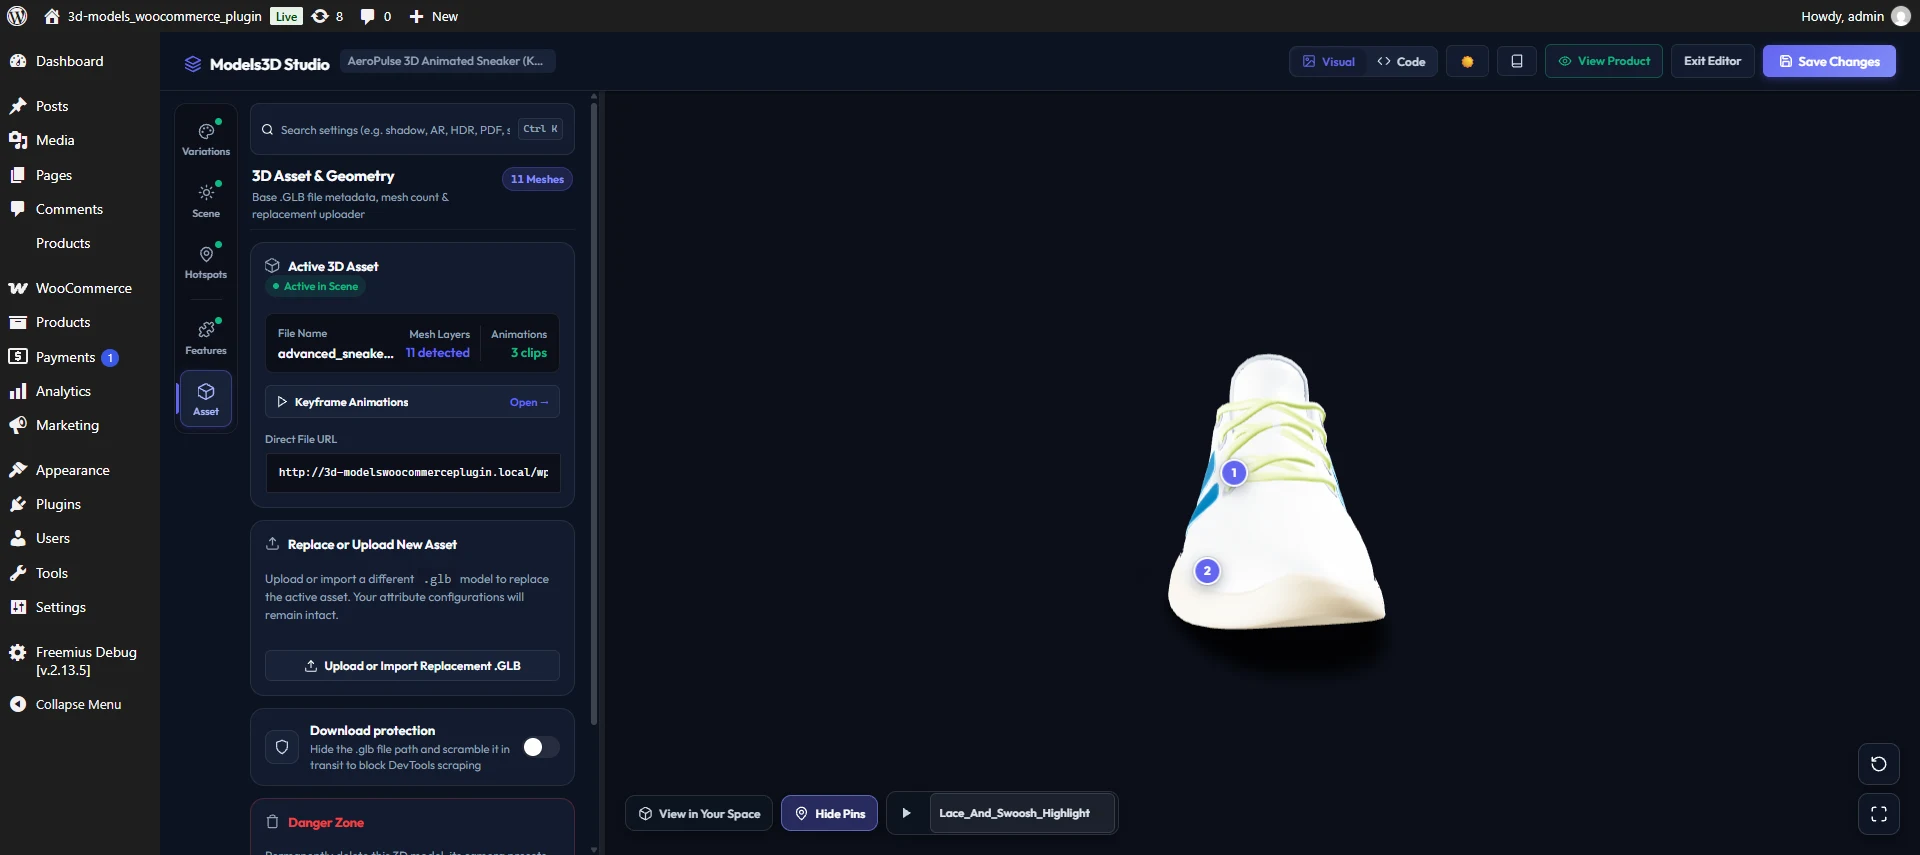
- Active 3D Model Metrics: Instant display of the active
.glbfile name, total detected mesh layers (e.g. 11 detected), and direct file storage URL. - 🛡️ 3D Asset Theft Protection (
[PRO]): Per-productDownload protectiontoggle ("Hide the.glbfile path and scramble it in transit to block DevTools scraping") that replaces the public/wp-content/uploads/*.glbURL with an expiring HMAC-SHA256 signed stream endpoint and scrambles the first64KBof the binaryglTFheader in transit. - Replace or Upload Asset: Upload a new
.glbor.gltfasset, import via HTTPS URL, or switch between the 4 Bundled Starter Models (High-Performance Sports Car, Forged Performance Wheel, Athletic Sneaker Showcase, and Designer Sunglasses) without losing previously configured attribute variations. - Danger Zone Model Management: Permanently delete the assigned 3D asset, camera presets, and mesh mappings from the WooCommerce product in a single guarded click.
Interactive Viewport Selection (Point-and-Click)
Instead of searching through endless lists of technical mesh names, the Visual Editor features Raycast Point-and-Click Mesh Selection directly on the 3D canvas, plus an expandable Scene Tree HUD overlay in the top-left corner of the viewport.
How Point-and-Click Mapping Works
- Real-time Hover Highlighting: Move your cursor over any part of the 3D model in the viewport. The hovered mesh layer illuminates in real time.
- Direct Click Selection: Click directly on the part of the model you want to customize (e.g., the shoe laces or watch bezel). The selected mesh lights up with an emissive highlight and toggles selection in the active variation card (or opens the Map 3D Mesh Modal if no variation attribute is active yet).
- Viewport Scene Tree Overlay: Click the Scene Tree (
N) pill in the top-left corner of the 3D canvas to inspect all mesh nodes or quickly toggle selection directly from the viewport.
3D Material Mappings & Variations
The editor bridges WooCommerce product variation options (e.g. "Colorway: Midnight", "Strap: Leather") directly to physical 3D mesh properties, visibility rules, spatial transforms, .glb files, and animations.
Important: Attribute Setup Workflow
Because the visual editor maps WooCommerce attributes to 3D mesh layers, follow this workflow:
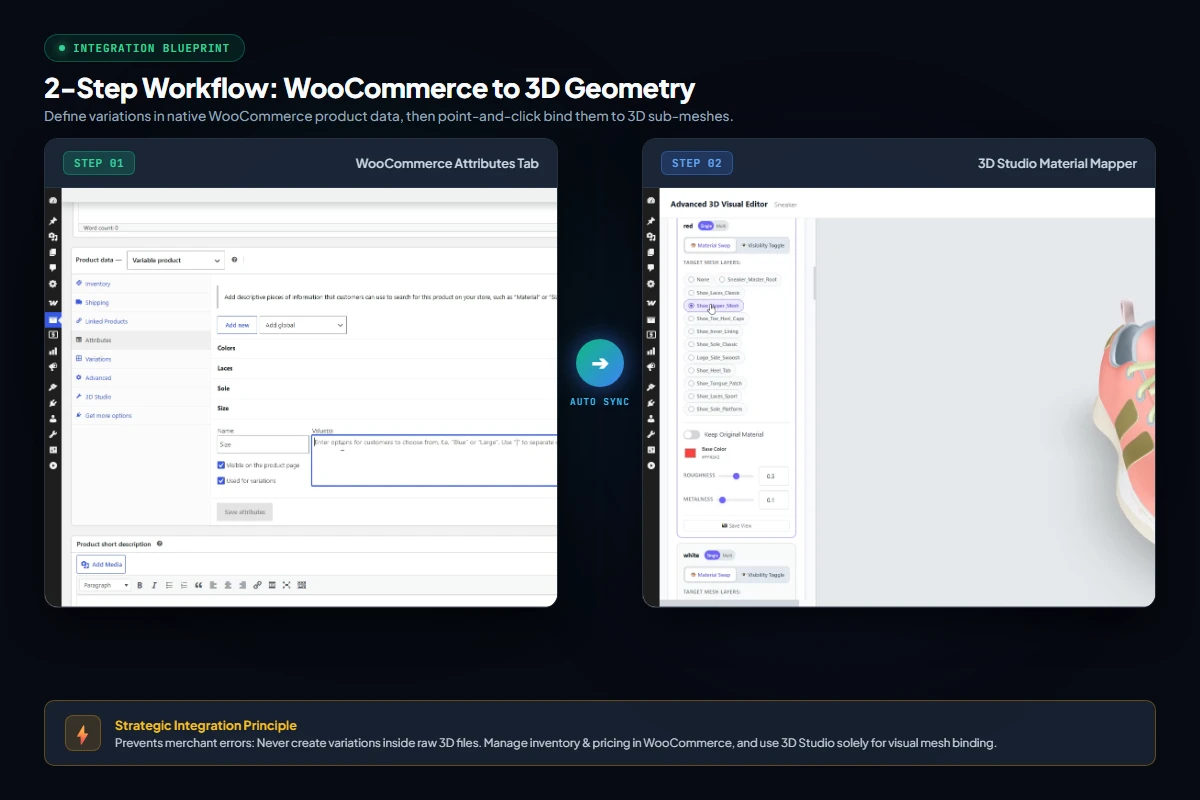
- Go to the Attributes tab in the Product Data box, add your attributes (e.g. Color) and terms (e.g. Red, Blue), and click Save Attributes / Update — or click
+ Edit Attributesdirectly inside the Visual Editor's Variations workspace. - Select each option pill in the Variations workspace and configure its Look, Visibility (
[PRO]), Transform ([PRO]), Model ([PRO]), or Motion ([PRO]) sub-tab.
Multi-Channel Cross-Attribute Precedence
When multiple attributes are active simultaneously on a product (for example, a Finish attribute applying PBR materials across all spokes and a Spoke Style attribute hiding unused spoke geometry):
- Two-Pass Visibility Precedence: The rendering engine evaluates all
showlists in Pass 1 followed byhidelists in Pass 2 with ancestor group shielding—ensuring explicithiderules cleanly override shared material layers. - Baseline Transform Reset & Shared Pivot: On every variation change, all meshes reset to their immutable initial rest pose (
m3dsBaseTransform) before applying activepayload.transformscale, position, and rotation offsets around the shared world-space pivot.
Camera Views: Scale-Aware Auto-Framing
Proper camera placement is essential for an engaging eCommerce presentation. Models3D Studio pairs automatic scale-aware framing with granular merchant camera controls, 1-click 2D poster capture, and orbital boundaries.
Scale-Aware 3D Auto-Framing Engine
Different 3D models vary drastically in size: a piece of jewelry might measure 20 millimeters, while a sports car measures 4.5 meters. Without scale calibration, small models appear as invisible specks and large models clip violently through the camera lens.
Models3D Studio solves this via dynamic geometric bounding-sphere analysis:
- Bounding Sphere Math: On asset load,
computeAutoFramecomputes the exact geometric center and bounding radius ($R$) of the entire mesh hierarchy. - Trigonometric Distance Calculation: The ideal camera distance ($D_{ideal}$) is computed dynamically from the camera's vertical field of view ($\text{FOV}$) and canvas aspect ratio: $$D_{ideal} = \max\left(\frac{R}{\sin(\text{FOV}/2)}, \frac{R}{\sin(\text{FOV}/2) \cdot \text{Aspect}}\right) \times 1.35$$
- Dynamic Frustum Calibration: Camera clipping planes are scaled proportionally: $$\text{near} = \frac{D_{ideal}}{200}, \quad \text{far} = D_{ideal} \times 100$$ When Allow Close-Up / Interior Zoom (
close_zoom) is enabled, the near plane tightens dynamically to $\text{near} = D_{ideal} / 2000$ so shoppers can zoom inside cockpit interiors or inspect micro-engravings without near-plane clipping. - Calibrated Exterior vs. Interior Zoom Limits: By default (
close_zoom: false), $\text{minDistance} = \max(R \times 1.35, D_{ideal} \times 0.42)$, stopping zoom cleanly outside the model's outer surface so the camera never clips inside the mesh. Whenclose_zoom: true, $\text{minDistance}$ drops to $D_{ideal} \times 0.02$. - ContactShadows Isolation: Ground contact shadows are decoupled from bounding-box centering calculations to prevent ground planes from biasing the auto-frame center.
Default Camera View, 1-Click 2D Poster Capture & Camera Limits (Free & Pro)
Located in the Scene workspace:
- 📷 Capture Default View: Locks the current camera position and target as
is_custom: trueso every store visitor lands on your chosen hero angle. - 🖼️ Also update 2D Poster thumbnail from this angle: Checked by default. Clicking Capture Default View automatically renders a
1024×1024WebP snapshot of the 3D canvas (composited over your configured solid or gradient background), uploads it to the WordPress Media Library, binds it as the product's 2D Poster Thumbnail (LCP), and automatically sets it as the WooCommerce Product Image if the product didn't have one yet. - Field of View (FOV) (
10°–90°): Narrow the FOV (15°–25°) for a telephoto studio look with minimal perspective distortion, or widen it (50°–75°) for dramatic close-ups. - Camera Orbit Limits (
orbit_lock):Free 360° Orbit (All Angles)— Unrestricted spherical rotation.Horizon Lock (Above Floor Only — Hide Underside)— Clamps polar angle to $\le 88^\circ$ (Math.PI * 0.49) so visitors cannot orbit underneath the floor plane or inspect unmodeled undersides.Horizontal Turntable Only (Lock Vertical Tilt)— Locks vertical polar tilt to $72^\circ$ (Math.PI * 0.42) for pure left-right turntable rotation.
- Allow Close-Up / Interior Zoom (
close_zoom): When OFF (default), prevents zooming inside the 3D mesh; when ON, allows deep interior and macro surface zoom. - Lock Panning (
enable_pan: false): Prevents right-click / two-finger panning from shifting the model off-center and automatically re-centers the orbit target at[0, 0, 0].
Floating Viewport Controls
The 3D canvas includes sleek floating HUD controls and full keyboard/screen-reader accessibility:
- Reset Camera: Smoothly glides the camera back to the initial auto-framed or merchant-captured viewpoint with orbital easing.
- Fullscreen: Expands the 3D viewport into an immersive full-browser presentation mode.
- Contextual Action Bar: Automatically displays active storefront tools along the bottom of the canvas: View in Your Space (AR), Hide/Show Pins (Hotspots), Animation Play/Pause & Clip Selector, Dimensions Ruler (
W × H × D), Explode Slider (0%–100%), PDF Spec Sheet, and Share Configuration Link. - WCAG 2.2 Keyboard & Reduced-Motion Support (
Free & Pro): SupportsTabfocus withArrowkeys to orbit,+/-to zoom,Spaceto toggle auto-rotate,R/Hometo reset the camera,prefers-reduced-motion: reduceauto-pause, andaria-live="polite"announcements.
Instant Scene Cloning & Developer JSON Suite PRO
PRO EXCLUSIVE TOOLING
Instant Scene Cloning & Developer JSON Suite is an exclusive feature of Models3D Studio Pro.
In the Free Community Edition, the studio operates in a streamlined visual mode with an inline developer teaser card (.m3ds-pro-trigger-json). Upgrading to Models3D Studio Pro activates the live Monaco-style code editor with two-way bidirectional synchronization, real-time schema validation, and instant cross-product JSON cloning.
For technical artists, agency developers, and experienced power users, Programmatic JSON Code Mode provides complete programmatic control over the 3D scene.
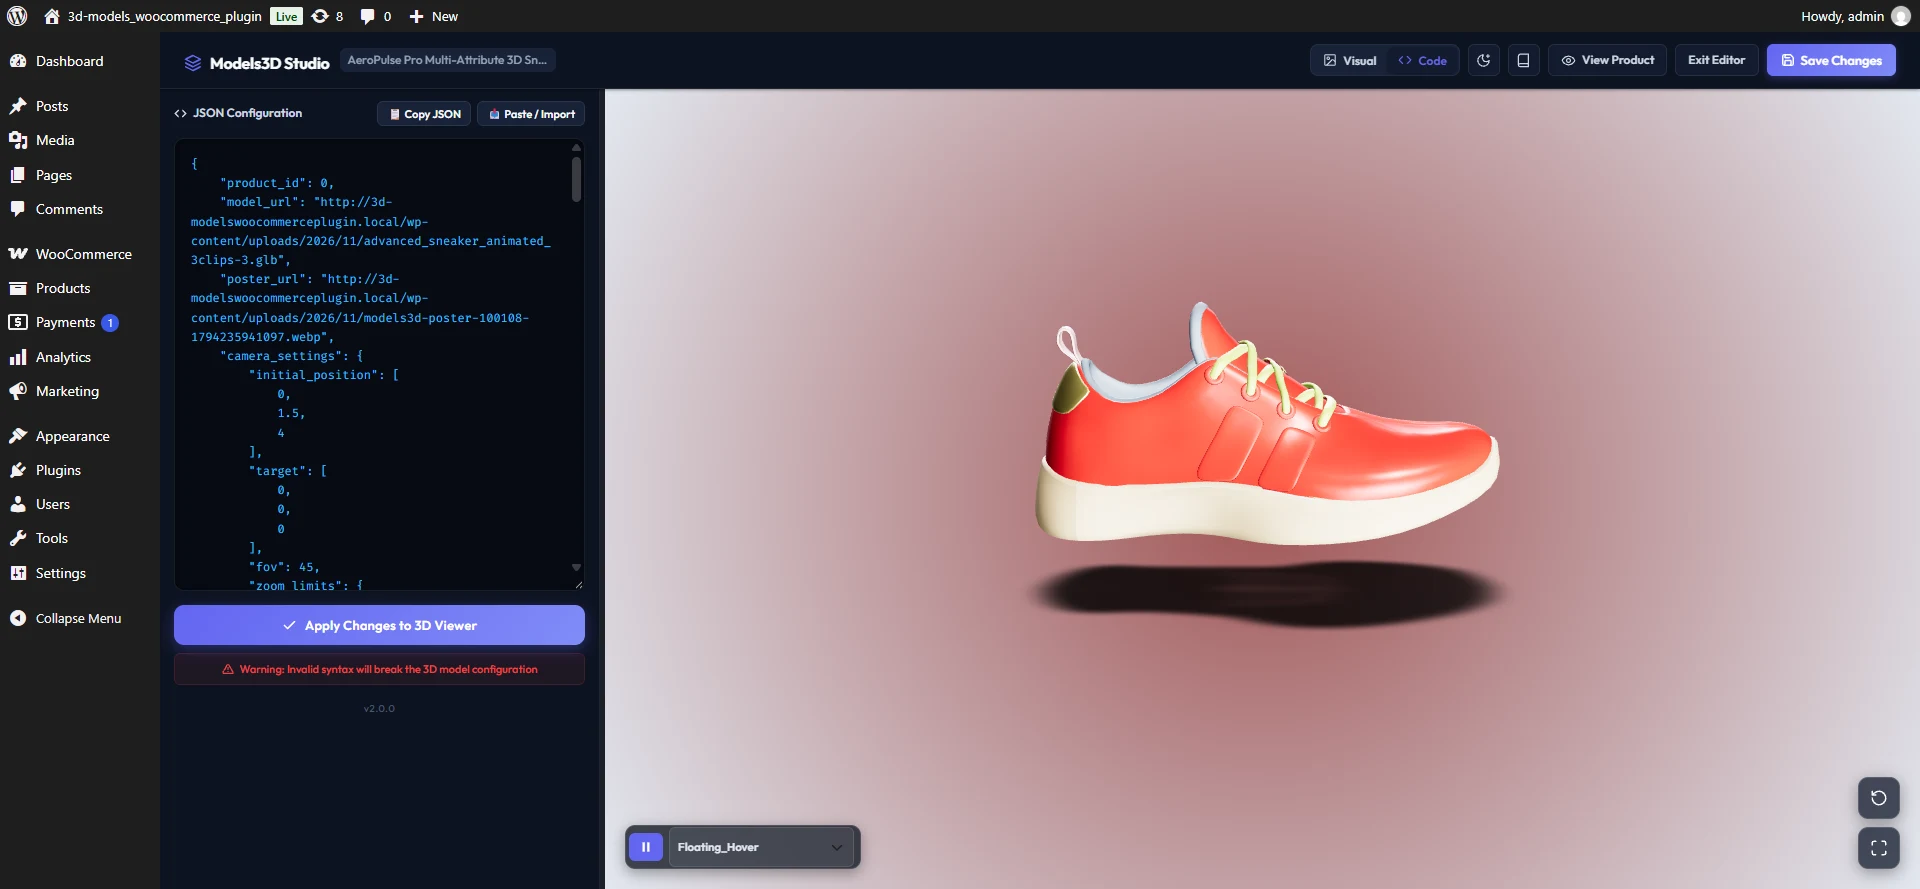
Two-Way Bidirectional Synchronization
- Visual Controls to JSON: Adjusting sliders, colors, or toggles in the visual dashboard instantly updates the JSON payload in real time.
- JSON to Visual Controls: Editing values or pasting JSON code automatically updates the visual sliders and variation cards.
- Live 3D Viewport Binding: Changes made in either mode are instantly reflected live in the 3D canvas without page reloads.
Advanced Capabilities Beyond the UI
- Emissive Glow & Intensity: Add self-illuminating glowing materials (e.g. RGB LEDs, headlights) via
"emissive": "#00ffcc"and"emissiveIntensity": 2.5. - PBR Texture Map Swapping: Assign external
normal_map_urlandroughness_map_urltextures. - Camera Zoom Boundaries: Define strict min/max zoom limits (
min_distance,max_distance). - Custom CDN HDRIs: Direct URL targeting for external high-resolution HDR environment maps.
Real-Time Schema Validation & Syntax Protection
The embedded code editor continuously runs real-time JSON schema validation and syntax checking:
- Instant Error Highlighting: Syntax errors (e.g., trailing commas, unclosed brackets, missing property quotes) are immediately flagged with red warnings in the code margin.
- State Integrity Protection: If JSON syntax is invalid or violates schema types, the Apply Changes to 3D Viewer button is automatically disabled, preventing corrupted or malformed payloads from committing to WooCommerce post-meta.
Universal Import & Export
- Product Cloning: Copy the JSON payload from one product and paste it into any other product sharing the same 3D model to replicate all settings, lighting, and variation rules in seconds.
- Safe Backups: Copy and store JSON blocks in your version control or project notes as instant recovery points.
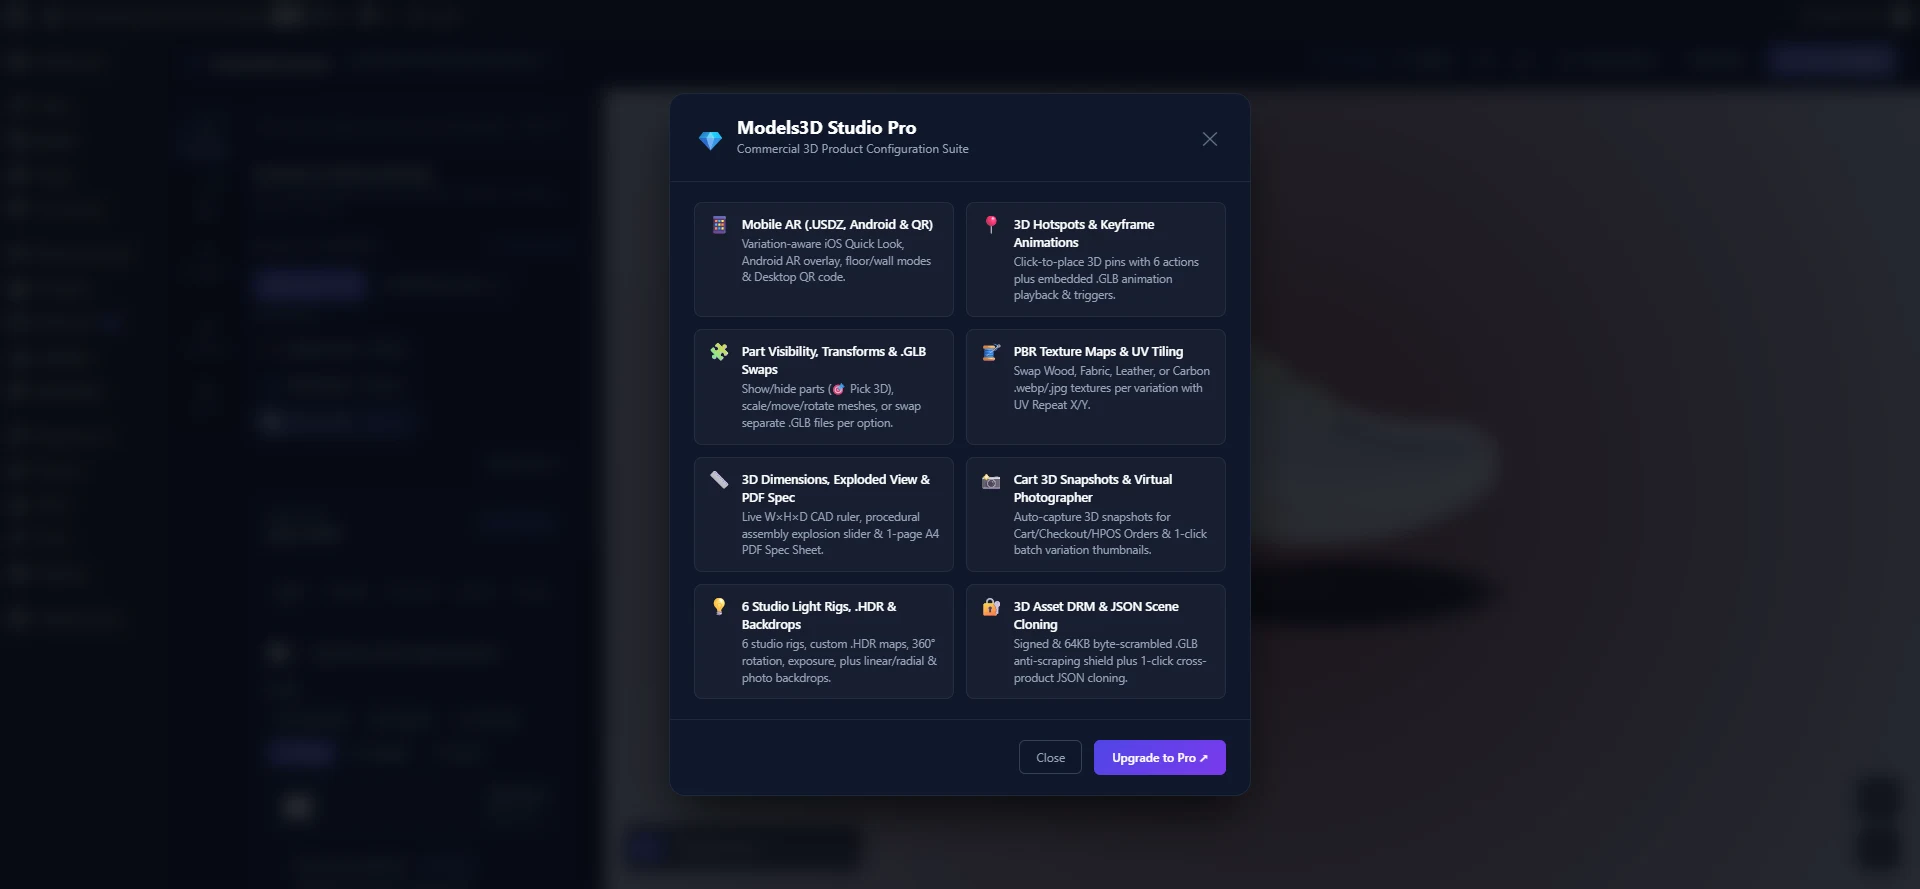
Models3D Studio Pro
Upgrading to Models3D Studio Pro transforms your WooCommerce store into an enterprise-grade 3D, Augmented Reality, and B2B CAD product configurator suite, unlocking 12 commercial capabilities:
- Mobile Augmented Reality ("View in Your Space"): Variation-aware iOS ARKit Quick Look (
.USDZ), Android Live Camera AR & Scene Viewer (.GLB), floor/wall placement, and Desktop-to-Mobile SVG QR Code deep linking (?m3ds_ar=1). - Interactive 3D Hotspots & Spatial Callouts: Raycast click-to-place 3D pins with 4 badge styles (
1,2,3,Dot,Pulse,+) and 6 actions (Info Card,Camera Focus,Trigger Variation,Swap .GLB,Play Animation,External Link). - Embedded
.GLBKeyframe Animation Playback: Multi-clip playback (Repeat,Play Once & Hold,Ping-Pong), per-variationMotiontriggers, hotspot triggers, and storefront Play/Pause HUD bar. - Per-Variation
.GLBModel, Texture Map & Part Transform Overrides: Assign separate.glbmodels, swap.webp/.jpgWood/Fabric/Leather texture maps with UV Repeat X/Y tiling, or scale/move/rotate parts per WooCommerce variation. - Part Visibility Toggles & 🎯 Pick 3D: Dynamic Show/Hide mesh rules per variation with two-pass cross-attribute precedence and in-viewport raycast picking.
- B2B CAD Tools (3D Dimensions Ruler, Exploded View Slider & PDF Spec Sheet): Live
W × H × Dbounding-box measurements (cm/mm/m/in), procedural radial assembly explosion (0%–100%with zero Blender animation required), and 1-page printable A4 PDF Spec Sheet downloads. - Live 3D Snapshot in Cart, Checkout & HPOS Orders: Automatic
320×320WebP capture of the shopper's exact configured 3D product on Add-to-Cart, persisted across Cart, Checkout, Order Emails, and WP Admin HPOS Orders. - Virtual Photographer (1-Click Batch Variation Thumbnails): Automatically render, capture, upload, and assign 2D WebP variation thumbnails across all options in 1 click.
- 3D Asset Theft Protection (Anti-Scraping Shield): Expiring HMAC-SHA256 signed stream URLs, direct-download
403 Forbiddenblocking, and first-64KB in-transitglTFbinary header scrambling. - Studio Lighting & .HDR Suite: 6 multi-light studio rigs (
3_point,2_light,1_light,front_showcase,top_softbox,headlamp), Light Elevation (10°–85°), 360° HDR rotation, ACES Filmic exposure (0.2x–3.0x), and custom.hdruploads. - Background Gradients & Photo Backdrops: Linear and radial studio gradients plus custom high-resolution photo scenes.
- Developer JSON Code Mode & Instant Scene Cloning: Bidirectional live code editor plus 1-click Copy/Paste Studio Config JSON across products.
Free vs Pro Feature Comparison
| Capability | Free Community Edition | Models3D Studio Pro |
|---|---|---|
Visual Studio v2 (5-Workspace Left Rail & Ctrl+K Search) | ✅ Included | ✅ Included |
PBR Material Swaps (Look Sub-Tab: Color, Roughness, Metalness) | ✅ Included | ✅ Included |
| 6 One-Click PBR Finish Presets & Keep Original Material | ✅ Included | ✅ Included |
| 1-Click "Capture Default View & 2D Poster (LCP)" | ✅ Included | ✅ Included |
Camera FOV, Orbit Limits (Horizon/Turntable), Zoom, Pan & Turntable Speed (0.1x–10x) | ✅ Included | ✅ Included |
Shareable Configuration Link (🔗 Share) & Cart Deep-Linking | ✅ Included | ✅ Included |
Gutenberg Block (models3d/viewer) & Standalone Shortcode | ✅ Included | ✅ Included |
Shop Archive "🧊 3D & AR" Badge & Modal Lightbox Mode | ✅ Included | ✅ Included |
| WASM Draco & >3MB WebP Browser Optimizer | ✅ Included | ✅ Included |
WCAG 2.2 / EAA Keyboard Orbit & prefers-reduced-motion | ✅ Included | ✅ Included |
GA4 / dataLayer Storefront Analytics Events | ✅ Included | ✅ Included |
Part Visibility Overrides (Visibility Sub-Tab & 🎯 Pick 3D) | ❌ Preview Teaser | ✅ Dynamic Show/Hide rules per variation |
Per-Variation Texture Map Swapping (.webp/.jpg + UV Repeat) | ❌ Preview Teaser | ✅ Seamless Wood, Fabric, Leather maps + UV tiling |
Per-Variation Part Scale / Position / Rotation (Transform Sub-Tab) | ❌ Preview Teaser | ✅ Shared-pivot 3D scale, offset & rotation per option |
Per-Variation Separate .GLB 3D Model (Model Sub-Tab) | ❌ Preview Teaser | ✅ Distinct .glb file per variation (ideal for Meshy AI) |
Embedded .GLB Keyframe Animations (Scene & Motion Sub-Tab) | ❌ Preview Teaser | ✅ Multi-clip playback, variation/hotspot triggers & HUD bar |
Interactive 3D Hotspots & Spatial Callouts (Hotspots Tab) | ❌ Preview Teaser | ✅ Click-to-place 3D pins with 4 styles & 6 click actions |
Mobile Augmented Reality (iOS .USDZ, Android AR & Desktop QR) | ❌ Preview Teaser | ✅ Variation-aware AR placement & dynamic SVG QR code |
3D Dimensions Ruler (W × H × D in cm/mm/m/in) | ❌ Preview Teaser | ✅ Live CAD bounding-box measurement overlay |
Procedural 💥 Exploded View HUD Slider (0%–100%) | ❌ Preview Teaser | ✅ Radial multi-part explosion (zero Blender animation needed) |
| 1-Page Printable PDF Spec Sheet & Quote Summary | ❌ Preview Teaser | ✅ Client-side A4 PDF with 3D snapshot, specs, SKU & price |
| Live 3D Variation Snapshot in Cart, Checkout & HPOS Orders | ❌ Standard 2D Image | ✅ Custom 320×320 WebP snapshot of configured 3D state |
Virtual Photographer (📸 Capture All Variation Thumbnails) | ❌ Preview Teaser | ✅ 1-click automated batch rendering & Media Library binding |
3D Asset Theft Protection (Signed & Byte-Scrambled .GLB) | ❌ Public Upload URL | ✅ Expiring HMAC token, 403 guard & 64KB header scrambling |
Studio Lighting Rigs (6 Modes), .HDR Upload, Rotation & Exposure | Standard 3-Point Rig & Azimuth | ✅ 6 Rigs, Elevation (10°–85°), Custom .hdr & Exposure |
| Background Gradients & Photo Backdrops | Transparent & Solid Color | ✅ Linear/Radial Gradients & Custom Photo Backdrops |
| Developer JSON Code Mode & 1-Click Cross-Product Scene Cloning | ❌ Preview Teaser | ✅ Live bidirectional JSON sync & Copy/Paste Config modal |
| Support & Updates | Community Forums | Asynchronous Email Assistance for Core Software Defects |
Pro: Studio Lighting & .HDR Suite
While the Free Community Edition provides 10 Drei environment presets, a scale-independent 3-Point Studio Lighting Rig, Light Intensity (0.0x–5.0x), and Light Angle Azimuth (0°–360°), commercial brands often require specialized studio rig geometries, specular reflection alignment, and proprietary .hdr lighting maps:
- 6 Multi-Light Studio Rigs (
light_rig): Switch between 3 Lights — Studio Surround (3_point), 2 Lights — Key + Back Rim (2_light), 1 Light — Single Key Source (1_light), 3 Lights — Front Showcase (front_showcase), 3 Lights — Overhead Softbox (top_softbox), and Camera Headlamp (headlamp) that dynamically tracks the visitor's orbit angle. - Light Elevation / Height (
10°–85°): Adjust the vertical height of your studio light sources to control top-down vs. side-lit sculpting. - 360° HDR Reflection Rotation (
0°–360°): Spin the HDRI environment map independently of camera orbits to position specular highlights and reflections precisely where they accentuate product contours. - Tone Mapping Exposure (
0.2x–3.0x): CalibrateACESFilmicToneMappingexposure to match physical studio lux ratings without clipping white highlights. - Native Media Library
.HDRUploads: Click Custom .HDR to launch the WordPress media modal and load any proprietary.hdrequirectangular lighting file.
Pro: Background Gradients & Image Backdrops
Elevate product presentation beyond plain solid colors with editorial-grade canvas backdrops:
- Linear Gradients: Configure dual-tone linear color transitions with custom angular orientation (0° to 360°).
- Radial Gradients: Create cinematic vignetted studio lighting that draws focus directly to the product center.
- High-Resolution Photo Scenes: Upload custom lifestyle photography or atmospheric studio renders directly to the canvas backdrop.
Pro: Visibility Overrides, Part Transforms & Separate .GLB Models
For stores selling modular products, customizable furniture, or multi-part machinery, Pro unlocks three structural geometry channels inside the Variation Inspector:
VisibilitySub-Tab (Show / Hide Parts & 🎯 Pick 3D):- Show or hide physical geometry per variation term (e.g., adding a roof rack, swapping 5-spoke vs. 10-spoke wheels, or alternating outsoles).
- Click 🎯 Pick 3D next to Parts to HIDE or Parts to SHOW to tag parts directly in the 3D viewport with green (
#10B981) and red (#EF4444) outline highlights, automatic opposing-list deduplication, andEscapekey exit.
TransformSub-Tab (Per-Variation Scale, Position & Rotation Offsets):- Scale, shift (
ΔX / ΔY / ΔZ), or rotate (°X / °Y / °Z) targeted mesh parts around a shared world-space pivot per variation (e.g., resizing a tabletop or raising an adjustable stand).
- Scale, shift (
ModelSub-Tab (Per-Variation.GLB3D Model Override):- Bind a completely separate
.glbfile to any WooCommerce variation option via drag-and-drop,Upload .GLB, orMedia Library—complete with automatic Pre-Flight vertex/file-size validation, in-browser WebAssembly Draco + WebP optimization, and sub-mesh layer extraction—so switching variations dynamically swaps the entire 3D asset.
- Bind a completely separate
Pro: Texture Map Image Swapping & UV Tiling
Inside Variations -> Look -> Fine-tune material, Models3D Studio Pro unlocks Custom Texture Map (.webp / .jpg / .png) swapping:
- Per-Variation Surface Textures: Assign realistic Wood grain, woven Fabric, stitched Leather, Carbon Fiber, or Brushed Metal texture maps from the WordPress Media Library to any variation option.
- Live UV Repeat X / Y Tiling (
0.1x–20x): Control pattern density across targeted meshes withTHREE.RepeatWrappingandSRGBColorSpace. - Automatic Planar UV Generation: If an imported CAD mesh lacks
geometry.attributes.uv, the engine automatically generates normalized bounding-box planar UV coordinates so texture maps still render cleanly without shader errors.
Pro: Embedded .GLB Keyframe Animations & Interactive 3D Hotspots
Bring mechanical assemblies, footwear, and electronics to life with spatial annotations and motion:
- Embedded
.GLBKeyframe Animations (Scene&Variations -> Motion): Automatically parsesgltf.animationstracks via a dedicatedTHREE.AnimationMixer. Configure default scene playback, per-variation animation overrides, or hotspot-triggered animations withRepeat,Play Once & Hold End Frame, andPing-Pongloop modes plus a storefront Play / Pause & Clip Selector HUD bar. - Interactive 3D Hotspots (
HotspotsWorkspace): Raycast click-to-place 3D pins ([x, y, z]+ surface normal) with<Html occlude>depth-tested badges (numbered,dot,pulse,plus) and 6 click actions (info_card,camera_focus,variation_select,model_swap,animation_play,external_link).
Pro: Mobile Augmented Reality (iOS .USDZ, Android AR & QR Code)
Let shoppers place their exact configured 3D product in their room at 1:1 physical scale:
- iOS ARKit Quick Look (
.USDZ): Pre-warms an Apple-compliant, 64-byte aligned.usdzarchive (USDZExporter) from the live configured Three.js scene (preserving active variation colors, custom texture maps, and hidden/shown parts) and launches native iOS Safari Quick Look in0mson tap. - Android Live Camera AR & Scene Viewer: Launches an instant in-browser rear-camera WebGL AR overlay (
getUserMedia) that works on all Android devices with or without Google Play Services for AR, plus a direct Google Scene Viewer intent trigger. - Desktop-to-Mobile SVG QR Code Modal: When a desktop shopper clicks "View in Your Space", a local ISO/IEC 18004 SVG QR code modal opens with the active variation parameters (
?m3ds_ar=1&attribute_...) and pre-cached server AR assets (m3ds_glb/m3ds_usdz) ready for instant phone scanning.
Pro: 3D Dimensions Ruler, Exploded View Slider & PDF Spec Sheet
Designed for furniture, hardware, automotive, and B2B industrial catalogs:
- 📏 3D Dimensions Ruler (
W × H × D): Displays CAD bounding-box measurement lines and dimension pills incm,mm,m, orin, updating live when variations scale or explode the model. - 💥 Procedural Exploded View Slider (
0%–100%): Radially separates multi-part 3D models along each mesh's rest-pose bounding-box center vector relative to the origin—requiring zero Blender animation tracks. - 📄 1-Page Printable PDF Spec Sheet: Generates a client-side A4 PDF 1.4 document containing a
960×600studio snapshot of the configured 3D model, product title, price, SKU, selected WooCommerce attributes, 3D dimensions, and configuration link.
Pro: Live Cart/Order 3D Snapshots & Virtual Photographer
Eliminate static default thumbnails across the buying journey:
- Captured 3D Variation Snapshot in Cart, Checkout & HPOS Orders: When a customer clicks Add to Cart,
StorefrontCartSnapshotManagercaptures a center-cropped320×320WebP snapshot of their configured 3D model (wp-content/uploads/models3d-snapshots/snap-<hash>.webp) and persists_models3d_thumbnail_urlon the WooCommerce cart item and HPOS order line item (displayed in Cart, Checkout, Customer Order Emails, and WP Admin Orders). - 📸 Virtual Photographer (
Capture All Thumbnails): Located in the Variations -> Bulk actions menu, iterates through every variation option in 1 click, renders each state in 3D, uploads a WebP thumbnail to the Media Library, and populatesthumbnail_url.
Pro: 3D Asset Theft Protection (Signed & Byte-Scrambled Delivery)
Protect proprietary CAD, jewelry, and custom .glb assets against unauthorized scraping:
- Encrypted Path Token & Expiring HMAC Signature: Replaces
/wp-content/uploads/*.glbURLs in storefront HTML with 15-minute HMAC-SHA256 signed URLs (action=models3d_stream_protected_model&token=...&exp=...&sig=...) wheretokenencrypts the relative file path usingwp_salt('auth'). - Direct-Download Blocking & First-64KB Wire Scrambling: Blocks direct browser tab navigation or
curlrequests (403 Forbidden), scrambles the first64KBof theglTFbinary header in transit, and unscrambles it in memory inside the viewer's fetch shield beforeGLTFLoaderparsing.
Turntable Auto-Rotation & Velocity Control (Free & Pro)
Auto-rotation showcases products from every angle. Both the Free Community Edition and Models3D Studio Pro include precision turntable velocity calibration from 0.1x to 10.0x inside the Scene workspace to match your product category:
- Slow-Motion Luxury Spin (0.1x – 0.5x): Ideal for jewelry, luxury watches, and high-end footwear where buyers need time to inspect subtle facet reflections.
- Standard Showcase Spin (0.5x – 1.0x): Balanced natural presentation velocity.
- High-Speed Dynamic Preview (2.0x – 10.0x): Perfect for automotive wheels, turbines, and dynamic sportswear demonstrations.
Pro: Programmatic JSON Code Mode & Live Sync
Directly inspect, edit, and validate the raw 3D scene JSON specification stored in WordPress post-meta with full two-way live synchronization:
- Bidirectional Live Sync: Switch to
<> Codein the Visual Editor header to edit colors, camera vectors, hotspots, or mesh names in JSON, click Apply Changes to 3D Viewer, and observe the 3D scene update instantaneously. - Schema Validation: Built-in syntax error protection prevents corrupted payloads from saving to WooCommerce post-meta.
- 1-Click Cross-Product Cloning (
📋 Copy Config/📥 Paste Config): Copy the JSON payload from one product and paste it into any other product (with an option to preserve the target product's primary.glbmodel URL) to replicate lighting, camera limits, and variation rules in seconds.
Pro: Instant License Activation & Upgrades
Models3D Studio Pro integrates seamlessly with Freemius Cloud licensing:
- Informational Capability Modals: Clicking any Pro teaser card or badge inside the Visual Editor opens the informational Pro Feature Modal (
showProFeatureModal), providing direct upgrade links. - Seamless Upgrade Migration: When upgrading from Free to Pro, existing product configurations, camera captures, and material mappings are 100% preserved.
- Silent Sibling Deactivation: Activating Pro automatically deactivates the Free edition cleanly with zero fatal redeclaration errors.
3D Asset Optimization & Guidelines
WebGL on mobile devices has strict memory and processing constraints. Following clean asset guidelines ensures fast load times and smooth 60 FPS performance across all devices.
The 250,000 Vertex & 15MB File Size Limits
- Absolute Vertex Ceiling: 250,000 vertices across all device types (desktop, tablet, mobile). Any model exceeding 250,000 vertices is intercepted by the Pre-Flight Inspector upon upload.
- Absolute File Size Safety Net: 15MB maximum per
.glbfile. This hybrid client-side and PHP server-side ceiling prevents out-of-memory (OOM) server timeouts and mobile browser crashes.
Load Time Target & Automatic WebP Texture Crunching
- Keep initial 3D model download sizes under 5MB (ideally < 2MB) to ensure sub-3-second load times on mobile 4G/5G connections.
- Intelligent WebWorker Texture Crunching (>3MB): Whenever you upload a
.glbfile exceeding 3MB (or 250,000 vertices), the ⚠️ Optimization Required confirmation modal prompts you to optimize the asset via an isolated browser WebWorker (assets/js/workers/gltf-optimizer.js) that converts embedded lossless PNG/JPG textures into high-efficiency WebP before uploading the file to WordPress.
Built-in WASM Draco Optimizer
Models3D Studio includes a 100% local, self-hosted client-side WebAssembly (WASM) geometry and texture optimizer powered by Google Draco and glTF-Transform. Storefront Draco decoder files (draco_decoder.wasm, draco_decoder.js, draco_wasm_wrapper.js) and draco_encoder.js are bundled locally in /assets/draco/, while the WASM encoder binary (draco_encoder.wasm) is compiled directly into assets/js/workers/gltf-optimizer.js with zero external CDN requests.
Two-Stage Optimization Flow
When an uploaded 3D model exceeds 250,000 vertices, the editor intercepts it with the Model Too Heavy modal:
Stage 1: Safe Optimization
- Click Proceed with Optimization.
- The WASM engine automatically compresses and retopologizes the geometry in your browser without causing visual distortion.
Stage 2: Force Crunch (Extreme Compression)
- If the Safe Optimizer stops to protect mesh topology but the vertex count is still above 250,000, you will be prompted with two choices:
- Abort (Fix in Blender): Recommended for complex CAD models to manually decimate in your 3D software.
- Force Crunch Anyway: The WASM engine aggressively decimates polygons until the vertex count falls below 250k. (Note: extreme crunching may cause visible artifacts on fine details).
Texture Baking & Draco Compression
Texture Guidelines
- Resolution: Never upload raw 4K (4096x4096px) textures to the web. Bake textures to 2048x2048 (2K) or 1024x1024 (1K).
- Format: Use JPG or WebP for opaque base color maps. Use PNG only when transparency (alpha channel) is strictly required.
- Atlasing: Combine multiple materials into a single texture atlas to minimize WebGL draw calls.
Exporting with Draco Compression
When exporting .glb models from Blender, 3ds Max, Maya, or Cinema 4D:
- Enable the Apply Draco Compression checkbox.
- Draco compresses geometry and vertex arrays, reducing file sizes by up to 80% with zero visual quality loss.
- Models3D Studio includes a high-speed WASM Draco decoder to decompress assets on the fly.
Frontend DOM Event Bridge
When customers select variation dropdowns or color swatches on your WooCommerce product page, the 3D canvas instantly morphs to match the selected option with smooth orbital physics.
Models3D Studio emits standard DOM events from the React Three Fiber canvas and the bidirectional EventBridge, and automatically pushes e-commerce interaction telemetry to Google Analytics 4 (window.gtag) and Google Tag Manager (window.dataLayer).
Listening to 3D DOM Events
javascript
// 1. Canvas Ready & Initial Mount
if (window.__woo3dCanvasReady) {
    console.log('3D Canvas already initialized and active');
}
window.addEventListener('woo3d_canvas_ready', function() {
    console.log('3D Canvas and WebGL context successfully mounted');
});

// 2. Individual Attribute Changed (Select dropdown, radio button, or color swatch)
window.addEventListener('woo3d_attribute_changed', function(e) {
    console.log('Attribute changed:', e.detail.attribute_name, '=>', e.detail.value);
    console.log('Active attribute set:', e.detail.all_attributes);
});

// 3. Complete Variation Matched & Shown
window.addEventListener('woo3d_variation_shown', function(e) {
    console.log('WooCommerce variation matched:', e.detail.variation);
    console.log('All selected attributes:', e.detail.all_attributes);
});

// 4. Variation Hidden (Partial or incomplete attribute combination)
window.addEventListener('woo3d_variation_hidden', function(e) {
    console.log('Variation hidden event:', e.detail.event);
    console.log('Remaining attributes:', e.detail.all_attributes);
});

// 5. Variations Reset (Customer clicked WooCommerce "Clear" variations button)
window.addEventListener('woo3d_variations_reset', function() {
    console.log('Variations reset to default model baseline');
});

// 6. Interactive Mesh Clicked on Storefront
window.addEventListener('woo3d_frontend_mesh_clicked', function(e) {
    console.log('Customer clicked mesh node:', e.detail.meshName);
});
Google Analytics 4 (gtag) & dataLayer Telemetry Events
Models3D Studio automatically dispatches a models3d_analytics_event CustomEvent on window and pushes structured events to window.dataLayer and window.gtag whenever shoppers interact with 3D and AR features:
models3d_viewer_loaded— Fired when the 3D model finishes loading (product_id,model_url).models3d_variation_changed— Fired when a variation attribute changes (product_id,attribute,term).models3d_hotspot_clicked— Fired when a shopper clicks a 3D hotspot pin (product_id,hotspot_id,label,action_type).models3d_ar_launched— Fired when a shopper triggers Mobile AR or opens the Desktop QR modal (product_id,platform:ios_quicklook|android_live_ar|android_scene_viewer|desktop_qr).models3d_share_copied— Fired when a shopper copies the shareable configuration link (product_id,url).models3d_spec_sheet_downloaded— Fired when a shopper downloads the 1-page PDF Spec Sheet (product_id).models3d_exploded_view_toggled— Fired when a shopper interacts with the Exploded View slider (product_id,factor).models3d_dimensions_toggled— Fired when a shopper toggles the 3D Dimensions Ruler (product_id,visible).
Backend PHP Filters Reference
Extend and customize plugin behavior using standard WordPress filter hooks:
Custom Template Override Filter
Override the default 3D gallery template path from your theme or child plugin (GalleryArchitect.php):
php
add_filter( 'models3d_locate_template', function( $template, $template_name, $template_path, $default_path ) {
    // Override template location for custom theme integrations
    if ( 'product-image-override.php' === $template_name ) {
        $custom_template = get_stylesheet_directory() . '/models3d-studio/' . $template_name;
        if ( file_exists( $custom_template ) ) {
            return $custom_template;
        }
    }
    return $template;
}, 10, 4 );
Inflate AJAX Variation Ceiling
For configurable products with complex variation matrices (e.g., 50+ attribute permutations), raise the WooCommerce AJAX threshold to prevent fallback to heavy server-side checks:
php
add_filter( 'woocommerce_ajax_variation_threshold', function( $threshold ) {
    return 500; // Increase threshold for complex 3D configurators
} );
Staging & Local License Testing
Local and staging license testing is handled natively through Freemius Cloud under WooCommerce -> 3D Studio -> License. Staging sites and localhost environments can activate development licenses without custom server constants.
Configuration JSON Schema Specification
The complete 3D scene state, camera coordinates, hotspots, storefront feature flags, and variation bindings are stored in the WordPress wp_postmeta table as serialized JSON under _models3d_studio_config.
Example Payload Structure (v2 Schema)
json
{
  "product_id": 476,
  "model_url": "https://example.com/wp-content/uploads/2026/08/sneaker.glb",
  "poster_url": "https://example.com/wp-content/uploads/2026/08/sneaker-poster.webp",
  "preflight_metadata": {
    "has_uv_maps": true,
    "vertex_count": 28450,
    "file_size_bytes": 1048576,
    "draco_compressed": true
  },
  "camera_settings": {
    "target": [0, 0, 0],
    "position": [0, 1.5, 3.5],
    "fov": 45,
    "min_distance": 0.5,
    "max_distance": 15,
    "orbit_lock": "free",
    "close_zoom": false,
    "enable_pan": true,
    "is_custom": true,
    "captured": true
  },
  "environment_settings": {
    "preset": "studio",
    "intensity": 1.5,
    "light_rig": "3_point",
    "light_azimuth": 45,
    "light_elevation": 45,
    "env_rotation": 0,
    "exposure": 1.0,
    "shadows_enabled": false,
    "auto_rotate": false,
    "auto_rotate_speed": 0.5,
    "protect_model": false,
    "ar_enabled": true,
    "ar_placement": "horizontal",
    "ar_scale": "auto",
    "ar_button_text": "View in Your Space",
    "dimensions_enabled": true,
    "dimensions_default_on": false,
    "dimensions_unit": "cm",
    "dimensions_scale_factor": 100,
    "explode_enabled": true,
    "explode_distance": 1.2,
    "spec_sheet_enabled": true,
    "spec_sheet_button_text": "Spec Sheet",
    "share_link_enabled": true,
    "animation": {
      "enabled": true,
      "default_clip": "Floating_Hover",
      "loop_mode": "repeat",
      "speed": 1.0,
      "auto_play": true,
      "show_controls": true
    },
    "background": {
      "type": "transparent"
    }
  },
  "hotspots": [
    {
      "id": "hs_1",
      "label": "Breathable Knit Upper",
      "description": "Engineered multi-weave mesh for lightweight airflow.",
      "position": [0.12, 0.34, 0.28],
      "normal": [0.21, 0.85, 0.48],
      "style": "numbered",
      "action_type": "info_card",
      "camera_position": [0.65, 0.55, 1.45],
      "camera_target": [0.12, 0.34, 0.28]
    }
  ],
  "mappings": [
    {
      "attribute_taxonomy": "pa_color",
      "target_mesh_nodes": ["Sneaker_Sole", "Sneaker_Laces"],
      "control_type": "material_property",
      "variations_map": [
        {
          "term_slug": "midnight",
          "thumbnail_url": "https://example.com/wp-content/uploads/2026/08/midnight-thumb.webp",
          "visibility_rules": {
            "enabled": true,
            "hide": ["Accessory_Strap"],
            "show": ["Sole_Accent"]
          },
          "payload": {
            "color": "#111827",
            "roughness": 0.35,
            "metalness": 0.1,
            "preset": "car_paint",
            "texture_url": "",
            "texture_repeat_x": 1,
            "texture_repeat_y": 1,
            "model_url": "",
            "animation_clip": "Lace_And_Swoosh_Highlight",
            "animation_loop": "pingpong",
            "transform": {
              "enabled": false,
              "scale": [1, 1, 1],
              "position": [0, 0, 0],
              "rotation": [0, 0, 0],
              "target_meshes": []
            }
          }
        }
      ]
    }
  ]
}
WebGL Diagnostics
Click the button below to simulate sending a secure diagnostic payload to the parent WooCommerce panel.
Common Troubleshooting
Model Fails to Load or Black Canvas
- Check File Format: Ensure your model is a valid
.glb(binary) or.gltffile. - Inspect Pre-Flight Warnings: Check if the model exceeded 250,000 vertices.
- Check WebGL Support: Visit the WebGL Diagnostics page in the documentation to verify hardware acceleration.
Mobile Safari Performance Issues
- Reduce texture resolutions from 4K down to 1K or 2K.
- Ensure textures are saved in JPG or WebP formats.
- Use the built-in WASM optimizer or export with Draco compression.
Sandboxed Iframe Warnings
Console notices regarding iframe sandboxing (allow-scripts and allow-same-origin) are harmless security indicators confirming that documentation is safely isolated from administrative operations.
REST API Uploads & Cookie Check Auto-Healing
When uploading custom 3D models (.glb / .gltf) or HDR environment maps, WordPress REST API requests can occasionally fail with a 403 Forbidden ("Cookie check failed") or rest_cookie_invalid_nonce error. This is a common WordPress core issue caused by browser cookie shadowing across differing paths (e.g., / vs /wp-admin/) or multiple concurrent admin sessions.
In v1.1.3, Models3D Studio introduces an automated session auto-healing mechanism (m3ds_auto_heal_duplicate_session_cookies hooked into determine_current_user and init):
- Collision Detection: The filter inspects
$_SERVER['HTTP_COOKIE']for duplicateLOGGED_IN_COOKIEtokens. - Validation: Each duplicate cookie is verified using WordPress core's
wp_validate_auth_cookie(). - Transparent Recovery: When a valid session is identified,
$_COOKIEis corrected and the authenticated user ID is restored before the REST authentication handler executes. Media uploads proceed smoothly without requiring users to clear browser cookies or log in again.
CORS & CDN Configuration
Tainted Canvas & Cross-Origin Errors
When loading 3D assets, textures, or HDR environment maps from an external Content Delivery Network (Amazon S3, Cloudflare, bunny.net, or a media subdomain), the browser requires Cross-Origin Resource Sharing (CORS) permission.
Without CORS headers, WebGL will throw a security error and refuse to render the model.
The Solution
Configure your CDN or server to return the following HTTP header for 3D file extensions (.glb, .gltf, .hdr, .bin):
http
Access-Control-Allow-Origin: *Apache (.htaccess)
apache
<FilesMatch "\.(glb|gltf|hdr|bin)$">
    Header set Access-Control-Allow-Origin "*"
</FilesMatch>
Nginx (nginx.conf)
nginx
location ~* \.(glb|gltf|hdr|bin)$ {
    add_header Access-Control-Allow-Origin *;
}
Uninstallation & Data Privacy
Models3D Studio adheres to WordPress.org data retention and privacy best practices.
Default Lifecycle Behavior
By default, deactivating or uninstalling the plugin preserves your 3D product configurations (_models3d_* post-meta) in the database. This guarantees that your 3D variation mappings, camera angles, and lighting presets are safely retained during plugin updates or temporary site maintenance.
Opt-In Complete Data Erasure
For merchants requiring strict compliance with data privacy regulations (e.g. GDPR) or those wishing to leave no residual database footprint:
- Navigate to WooCommerce -> 3D Studio -> Settings in your WordPress admin.
- Enable the Erase all 3D Studio data on uninstallation toggle (
models3d_erase_data_on_uninstall). - Save settings.
When this setting is active, deleting the plugin via WordPress Admin triggers uninstall.php, which executes a clean SQL purge removing all plugin post-meta and options from the database.